Showing posts with label ritchie falls. Show all posts

Monday, August 01, 2016

Temptation!

...musings

Danger, Will Robinson. Danger.

Michael at Red Umbrella Inn across the road from me just got a brand new drone. He was showing it to me then the phone rang and he handed me the controller. Argh!


Damn. You can even tell it where "home" is and it will land itself right there. You can set it to follow you as you drive or ride in a boat. It climbs up to 150m in a few seconds. We couldn't even find it in the sky up there. Take hands off the controls and it hovers motionless. You can rotate it. You can tilt it. You can look through its camera on your iPhone. You can send it to map coordinates or just to a spot you choose on a map.
Thou shalt not give in to temptation. Thou shalt not give in. Thou shalt not...
I didn't. I handed it back to him two minutes later.


Trends?


It's interesting that every now and then something pops up in the photography community – especially on Facebook – as a trend. I suppose that has something to do with the groups you hang out in, but lately, everywhere I look, people are posting images of the Milky Way.

Some of them are quite spectacular, or they would be if I wasn't seeing dozens, if not hundreds of them. Digitally enhanced pictures of the galaxy with a well-composed, dramatically lit foreground. They set a standard that I sometimes can't reach, since I don't have desert rock arches or fabulous sea formations in range, but they do set some goals.

Hopefully the Weather Gods will cooperate and we'll be able to shoot some star fields up in Wawa during the Gales of November workshops! (Still some space on the second weekend! Visit www.photography.to/gales for details).

Other trends? 360° SmartPhone shots. Long exposure shots of waterfalls and rapids. Fox kits in Algonquin Park and elsewhere. Focus stacked macro shots. And in my case (I'm guilty as well), images altered with plugins like Topaz Impression.

Back to the basics

It's time to get back to the basics. That's really easy to say — when going off in the artistic direction is as easy as clicking the mouse. But it's that time. I'm going to try!


Last week, I spent a pleasant couple of days with Bruce Peters, a Mississauga photographer friend of Hilary McNeil-Smith. We shot various venues around the Highlands. His presence inspired me to get out and take a fresh look at some places and times I've shot before. 


One of those places was Horseshoe Lake at Dawn. We didn't get a spectacular morning, but the mist on the water and the subtle pastels of the sky were interesting as usual. Here are three images before, during and after sunrise.  I'm never disappointed when I make the effort to get out early!

We visited another spot I like, where Highway 118 crosses Boshkong Lake. I gave into my desire to turn a photo into a piece of digital art...


Topaz Impression 2, Impasto preset (modified). I'm going to try to reproduce this in oil on canvas. Wish me luck! 

We went to some other spots I favour, including, of course, the Minden Wildwater. Then we went to Ritchie Falls. In both places, I mounted my 10-stop ND filter to smooth the water...


Here again I admit to doing a "little" post-processing!


The following morning my attraction to basic landscapes continued and I got up early to shoot this image behind the Red Umbrella Inn. I had actually shot a series of brackets intending to merge them as an HDR but I liked this one on its own, so there's very little processing done here. 
Back to the basics.


The Highland Yard, 2016 edition

I don't know the actual count, but I'm guessing there were about 150 participants at most, although it looked like there were as many as 50 runners in the 10K race. And that total included a whole bunch of smaller kids in the 2K. Still, it was a nice event and there were some photo ops! I hoped to do some different shots from previous years... at the start, I shot the runners coming at me with a telephoto lens, hoping to catch some good body positions and bright colours. When they returned to the finish line, I shot two ways: wide angle shots from a low point of view, then I switched to a long telephoto to capture faces and expressions. Here are a few images.


 I'm addicted to Topaz Impression among others... here's an image from yesterday's Highland Yard 10K event. However the plugins are so popular now that using them might make you part of the crowd as opposed to showing your individuality. Sort of like Harley Davidson riders who want to be different but they all look alike! 

I want to use my Impression-generated images for inspiration. Maybe I can express myself that way. However, I suck at painting.Harvey has said to be patient... when I have 50 years painting experience, like I do in photography... only problem is, I'll be 120 years old! 
I was a little disappointed this year. With one or two exceptions, there was nobody who had dug deep to run this race. No sweat-stained shirts, no agonized expressions, no ecstatic arm-pumps crossing the finish line. Just a bunch of people jogging in, checking their iPhones or their wrist-mounted stopwatches for their times, smiling and waving to their friends. I'm not sure what that means. Anyway, here are some more images:


Another "artsy" shot that just spoke to me. Candidate for a book cover?


Old man's leg, young man's shoe! 


There were some exceptions. Someone who was proud of her achievement and wanted to shout it out to the world! 

Another exception. This guy crossed the finish line, took one step and collapsed. Race staff hydrated him and he was OK later. 

File this lady under "Perseverance". She should be on a poster with that as the title. She came into the finish line running, not walking and with a look of commitment as you can see. Kudo's, lady. I couldn't do what you did. 
 
I just thought these two ladies made interesting photo subjects. Remember, you can click on any picture to blow it up.


Focus Pyramid

I bought this "Focus Pyramid" for the club and spent some time micro-aligning my lenses. The 70-200 Nikkor was the closest to zero and the Tamron 150-600 showed the most deviation. Interestingly it was different when I set it to 600mm and part way, around 400mm. I chose the 600mm alignment adjustment because that's the most critical point.


As you can see, you have to look very carefully to see where the lens is actually focusing. This shot was at a setting of +10 and I finally chose +8 as the setting (the range was -20 to +20). HHCC club members are welcome to borrow this focusing target to align their lenses. Contact Gord... 


Speaking of exercise...

Dr. Ron & Rob K came up for the day on Friday with the intent of bicycling the Rail Trail from Haliburton to Kinmount. I dropped them off in Haliburton (nice car, Rob. Embarrassing how long it took me to figure out that you need to press the brake to start it!), then went home to take a nap while they sweated their way down the trail. When I picked them up about 3 hours later, I didn't join them in their celebratory milkshake/icecream because I felt I didn't deserve it!


The intrepid road warriors, leaving Haliburton. The weather cleared up and it was bright and sunny when I awoke from my nap a couple of hours later! 
Then we went back to Ritchie Falls. It's tough shooting in the bright sun, so I chose to do some abstracts using my neutral density filter. 


A tree at Ritchie Falls that will need a few more visits with camera and sketch pad in hand! 

So that ends another July in the Haliburton Highlands. Lots of stuff going on in August, so stay tuned. And if you're thinking of booking the Gales of November workshop (www.photography.to/gales) better get going, only 4 spots left!

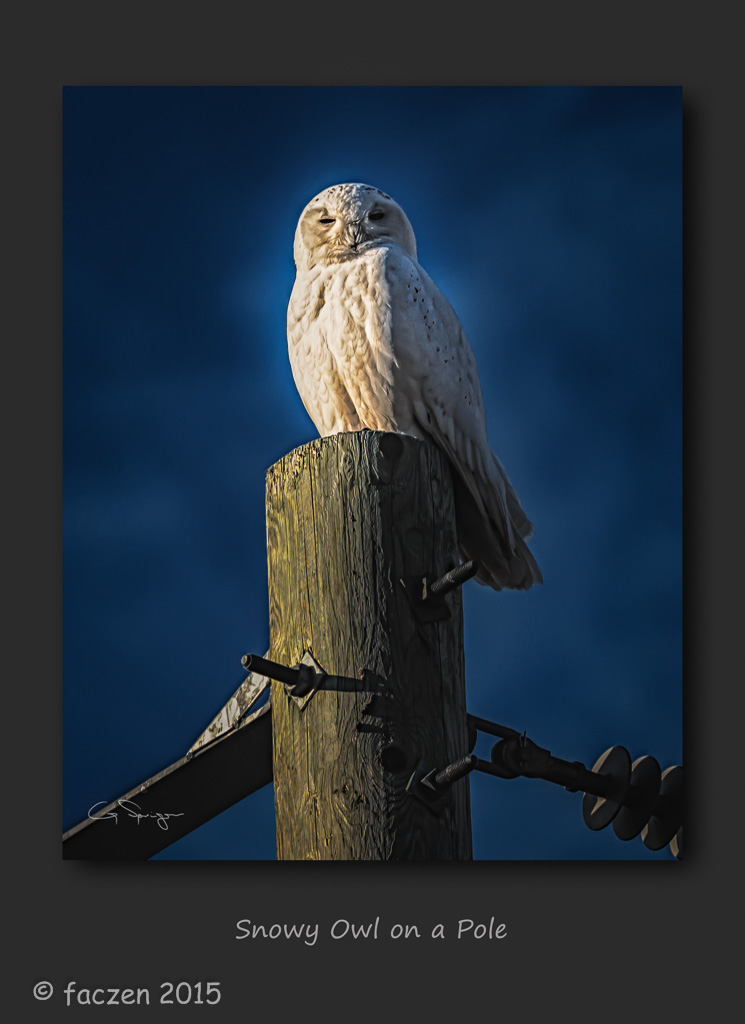
PS: A whole blog post and not one bird picture! Don't get used to it!

— 30 —

Friday, May 01, 2015

I wasn't going to do it!

Why use Lightroom?

I just wrote the following in response to one of our club members' question about why use LR when you already have Elements.
As far as editing is concerned, all three: Lightroom, Photoshop and Elements share the same processing engine, known as Adobe Camera Raw or ACR. But each program does other things outside that function.
■ Photoshop contains all the tools you'll ever need to manipulate a photo. You can edit right down to a single pixel with precision, if you can imagine it, you can do it in Photoshop. Twelve different ways, I might add. If you have the time and patience, that's the program to use. It has a steep learning curve, but you don't HAVE to use all the tools if you don't want to.
■ Elements contains a subset of the most commonly used, the more simple tools in Photoshop. And it's presented in such a way that you don't have to be as schooled to understand them. You can pretty well get to where you want to go but it might take some time to get there. Using Elements is sort of like using your camera on "Automatic", it's a 'Point-and-Shoot' editing program.
■ The downside of both of these programs is that they are designed to work on one picture at a time. Lightroom is designed to help you work with multiple images. Its forté is organizing your images and workflow by letting you import, file and flag and label a card full of images, edit them, let you switch out to PS to adjust them if you need more in depth manipulation, then you can export them for whatever purpose you have in mind, whether it's for print, for the web, for a slideshow, whatever. 
The point of Lightroom is that it takes a fraction of the time to process images compared to the others. I can import 200 pictures, mark and select which ones to work on, do basic editing on those and get them ready for export in 30 minutes: which is about the same amount of time it takes to manipulate one single image in the other programs. It's a workflow machine.
What it DOESN'T do is work with layers or combine multiple images (except for the new HDR and Pano functions in LR 6/CC). Personally I spend 85% of my post-processing effort in LR and only go out to PS when I need to go above and beyond.
Make sense?

Speaking of Lightroom

I told everyone I wasn't going to upgrade to LR CC (Lightroom 6) until I could see what kind of experience others were having with it. I gave in. I actually held out for... oh, I don't know, 8 hours? LOL. I downloaded and installed it on one machine that night.

First problem I had was getting it to run. To make a long story short, it wouldn't work – wouldn't even open – until I logged out of the Creative Cloud and logged back in. Then it worked seamlessly.
One weird thing: it decided that my F: drive – my external master image storage drive – should henceforth be known as the G: drive, which messed up a bunch of relationships! I simply renamed it and was back in business.
The first thing I did, after making sure everything was still there (and it was), was to do an HDR merge using the new function in Lightroom 6. Here's the first image I processed:


Two clicks made this image. Well actually I had to adjust some sliders afterwards, but really basic stuff like exposure and black and white levels and shadows. From zero to done in two minutes flat.

The resulting image in Lightroom is a natural, not heavily manipulated picture, that even people who say "I Hate HDR" can't find fault with. But the best part is, different from all the other HDR programs I have, the merged file is a RAW file (DNG) with a virtually infinite scope of what I can do with it afterwards. I understand the new Pano function is similar but I don't have any test images to try it on right now*.
Now I do! See below.
The main advantage of the upgraded program is supposed to be an order-of-magnitude improvement in speed. Apparently they worked hard at optimizing how it processes images. Time will tell.

The other big thing they're touting for LR6/CC is Facial Recognition. Not something I care about since I'm primarily a landscape shooter, but you never know. The other thing is seamless integration with Lightroom Mobile that allows you to edit images on portable devices. But if I want to edit images I want to do it on my 26" monitor with my Wacom stylus in hand and an i7 quad-core processor slaving away in the background, so it's not for me. By the way, I have limited internet speed and bandwidth so I don't use any kind of cloud storage.

So far Lightroom 6 seems to be a seamless upgrade. We'll see...

Lightroom 6 Pano function

It's brilliant. Almost seamless. Check this out:


This is a giant pano. It's made up of 12 images automatically stitched together by Lightroom. Each image is 36Mp and the finished composite is almost 300Mp in size! Go ahead, click it. You still can't see it in all its glory! It's 32,273 pixels wide! Why? Look at this: 


This is a tight crop out of the pano above. I've shot large format: 4x5, 8x10... I think digital just caught up.  

Lightroom also automatically created this pano merge:


I shot this upper left, upper right, lower left, lower right. Lightroom AUTOMATICALLY put them together in the right way. It's a 120Mp file. I'm impressed.

By the way, this is my latest painting. It's Ritchie Falls, as you saw in last week's blog.  

New Header


I created the new header for the blog using the pano feature in Lightroom 6/CC. It's a bit taller than I usually use, wish I didn't have to cut the top off that tree! By the way, it's 20 merged images: I merged four 5-shot HDR's, then put them together as a pano. And there's a little touch of Topaz Impression, Rembrandt 1 preset in there.

You win some...

I had high hopes for these images. But they didn't go where I wanted them. I'm posting this as a reminder that sometimes what you see in your mind is not what you can capture with the camera or even produce in post-processing.

I was practicing what I preach. As I drove past this hillside on a rainy Monday, the little water rill caught my eye. I was on my way back from my painting class, without my camera in the car (OK, that part I didn't do as I say...) so I marked the spot, drove home, picked up the camera and came back. Here's what I originally saw:


This is straight out of the camera except for a minor exposure adjustment. 

I liked the colour palette. Something I'm paying more and more attention to these days (I'm finally catching on, Rosa, if you're still reading my stuff!). The beech and oak leaves still hanging on the trees added a brilliance to the scene. And of course, the rushing water... you can probably see what made me stop. But when I got it home, I wasn't excited.

I did shoot a 5-shot bracket so the first thing I did was to merge them to HDR. Really a waste of time: this is NOT a high-dynamic-range scene, it was overcast and raining. And if you looked at the histogram, there was nothing blown out or filled in. But the HDR merge did increase the detail level some. Then I increased saturation and got this:


I thought vertical worked better.  
My next thought was, "too much going on". So I tried to lose some detail, using various tools like Topaz Simplify, negative clarity... nah. Another attempt, using Topaz Impression with an impasto preset (but multiplied in to enhance the tone of the shadows, not so much the texture):


Now I ran "Simplify" on the image again, and masked out the river and the yellow tree, and here's the image closer to what I envisioned:


Not really what I was after, and not my favourite image ever, but it has its points!

I looked around before getting back in the car. "Working the Scene". I shot a closeup of some weeds, but didn't get much (I really have to get a macro lens!). Then about 100m to the right, I saw the scene below. Again, the colour palette was what attracted me and also, I had just spent a couple of hours learning how to paint rocks on canvas with oil paint, and I thought this scene had potential:


When I paint it (and I am planning to!) I can leave out some of the distracting brush in the foreground and get rid of that green leaf at right. I know I don't have the painting skill to make this come out the way I want, but it's worth a try. Wish me luck!


One more...

I took this picture yesterday, after coming out of the endodontist's office. I'd just had a root canal (doin' fine, thanks for asking!). I'm pretty sure this is his car... he did great work and deserves to be well paid! Well, maybe not THIS well...


This is a Tesla Model "S", P-85. All electric. Look it up! Over $100 Grand...

5-shot HDR, processed with Photomatix, tweaked with Lightroom 6/CC. 

Next week: images from the Carden Plain. The new header picture comes from there.

— 30 —

Sunday, April 19, 2015

I'd be lying...

...if I told you that the reason you haven't read a blog post from me since April 4th is that I've been too busy out there taking pictures in the burgeoning spring weather. Not true. Fact is, I'm going through somewhat of a dry spell, photographically. There are a few reasons, maybe by writing them down they might go away.

While it might be Spring on the calendar, it's just getting started here. I'll admit that the last few days have been nice but where I live, the grass is still brown, where you can see it through the melting snow piles (not fair, I suppose. The snow's mostly gone, but the ground is brown and soggy, muddy). Just not interesting...

In Toronto, spring has sprung but they don't believe me when I say the lake here is still mostly ice covered. This winter, the ice was thicker than most people can remember – my neighbour said over 30" thick in places where it's usually half that – but I wouldn't be venturing out there, it's paper thin in places! 

But here's the good news: the birds are back. The other day I saw (for the first time) a pair of sandhill cranes in flight, 'way too quick to get the camera out but Gawd, those are elegant birds in flight! All the usual suspects are back, turkeys galore, robins, osprey, mourning doves, American goldfinch, and the usual blue jays, nuthatches, chickadees, woodpeckers and grackles. I'm looking forward to heading down to Carden Plain in a couple of weeks.


Speaking of birds, this snowy owl was still hanging around last week. Guess he'll be heading up North soon.  

Also speaking of raptors like owls, our outing to the Canadian Raptor Conservancy is now booked and full up. Looking forward to that too!

I find myself looking at images online for inspiration and not getting much. After a while they all look alike. I want to make my work stand out from that crowd, so I'm waiting for the creative juices to flow. 

You ever have so much to do that you don't know where to get started? That's where I'm at right now... I'm on deadline for both a presentation and judging a large  competition... I really have to stop saying "yes" to people! I'm working through some other issues too, which leaves little time for writing (I really want to get back to my creative writing!) but I'll be back, so don't go away mad. 

Johnny Ferreira photoshoot

I did get out to shoot one assignment last week that I thought I'd share. My friend Styles called and asked me to do a headshot for a musician he's working with. I only had an hour to shoot, but spent a day so far on post-processing.


This is the image he wanted. The original, straight-out-of-camera is on the left so you can see that I did a little retouching work in addition to swapping out the background. I used a technique called "Frequency Separation" which did a good job of NOT turning him into Barbi (OK, "Ken"). It's technical, but not difficult, so if you're interested, go to YouTube and Google it. The tutorial I found most useful was by Frank Doorhof, here.  Notice the teeth and eyes, by the way.

Just for fun, here are some shots I liked for ME, not necessarily for him. 


I shot this while I was setting up the lights, just as a test; but I really like the feel. By the way, I used an off-camera strobe with a Gary Fong Diffuser on it, and later, a reflector disk (but not in this shot). I told Johnny just to do what he wanted, I was only setting up. Have to do that more often!

This was an interesting sketch created from one of the images. I added some layers with the guitar in different positions, then ran it through a complicated Photoshop action from John Stevenson in Colorado that makes use of Topaz Impression. 


I did a colour version too. Click to blow it up! 

But this is the image I liked the best from the shoot. Styles said they might consider it for a CD wrapper on an upcoming album:


I just liked how he was framed by the neck and headstock of the guitar. I added a textured background from Flypaper textures within Photoshop, as well as the retouching tools I mentioned above. 


The other thing I've been doing is painting. Here's one that's almost done, using a technique called 'sgraffito' which entails scratching off a fresh wet paint layer to reveal what's beneath it. 


I did take the easel and paint stuff out to Ritchie Falls the other day. It's a LOT more difficult than I'd imagined! I took some photos from the same spot, which I'll show you when the painting is a bit further along.  


— 30 —

Monday, January 03, 2011

Don’t Eat the Yellow Snow

OK, I admit it. There isn’t any yellow snow, but I’m using catchy headlines to grab your attention! A shameless attempt to lure you into visiting this blog. Hope you don’t catch on too soon!

As I said in the last post, I was rambling on too long to include a bunch of other topics and images that I had set aside to add to the blog. So I thought I’d do a little catch-up here.

New Car
Remember I said I was getting a new car? I did. A couple of days before Christmas, I picked up my 2011 Subaru Forester. I bought it because (a) my 2003 VW Passat was aging with 210,000 km on it and things were starting to break and cost me money, (b) I felt the need for all-wheel drive up here in snow country and (c) I wanted the extra carrying capacity. Minden Subaru cut me a great deal on a lease, so without further ado, here it is:


Mountain Stream
On December 24th, I decided to go for a drive. First destination was the secret site where the locals go to fill up their water jugs with crystal clear spring water. I only learned about this spot a few weeks ago (thanks, Mike!). I don’t know the history of it, but someone obviously built a stone structure and directed the stream through a hose.


Here I am filling up a water jug at the secret stream.


Can’t you just taste the fresh, clear water when you look at this shot?
This is a really small crop out of a bigger image.
I’ll go back and do it again full frame.

Frozen Waterfall
I continued driving and as I left Haliburton, I remembered that Brian, a photographer I met on the trip to Lake Superior, had told me about a waterfall off the Gelert Road, called “Ritchie Falls”. I thought I’d try to find it, and I did! Here’s an image:


The surface of the waterfall was all frozen but the water was flowing underneath. I took a slow exposure (2 seconds) to smooth the water. It was already very dark, so I wasn’t able to capture the other neat thing going on – in the water pool there were dinner-plate size ice floes milling around in the current. I still don’t know how to photograph them effectively.

Waiting for Hard Water
The Red Umbrella Inn dragged its ice fishing huts out of the parking lot and placed them on the ice in the shallows near shore. The ice further out, where they’ll eventually end up is still much too thin to support them, so they staged them here, ready to go. I was out for a late afternoon walk and caught this image at sunset


This is an HDR created with Photomatix Pro. I couldn’t decide which of two compositions I preferred. The other one shows more foreground but this one feels right. I printed it as a 20x30 poster and it looks awesome!

Update:
on Thursday, most of the ice huts had been hauled out to the deep water on the lakes. But New Year’s eve and New Year’s Day were exceedingly warm, and the ice surface was suddenly liquid, not solid. I imagined them sinking into the water but I guess the ice was thick enough. On Saturday, I caught this shot of a guy standing out in the pouring rain. Hope he caught something! Next time maybe he'll pay the rental fee for a hut!


It froze again on Sunday. I started to walk out a bit to get some pictures but the surface of the ice was like a perfect, Zamboni-ed skating rink. Incredibly slippery. I chose not to go out too far, and I saved the camera when I didn’t fall down! Pulled a muscle doing it, though. The things we do...


Well that was it for 2010, here comes a whole new baby year. We’ll see y’all in 2011!


Glenn

.