FacZen Photography Tips A couple of Photoshop quickies!
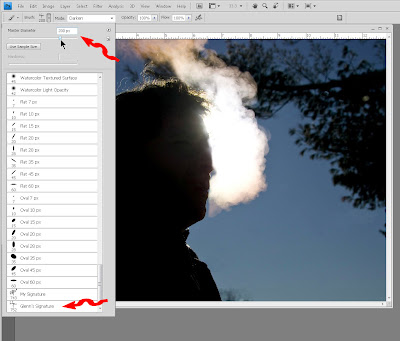
Tip#1: Signing your photographs — This is incredibly simple. I saw it first in the Adobe Photoshop CS3 for Digital Photographers book by Ben Willner. You can create a custom brush in Photoshop, so that you can simply stamp your signature (or copyright notice, or anything else you might want to put on a bunch of images) onto the images. And the beauty is, you can use any of the blending and colouring methods you want to the signature. Start by getting the signature into the computer. One way is to open a new document in Photoshop and sign using a Wacom graphics tablet or equivalent. Make the document a reasonable size (you can crop later) and set the resolution to 300 ppi so you can use it on images you are going to print. Use a nice smooth brush tool — in the example here, I used a 13px hard brush and black ink on a 1000 px wide document (I forgot my Wacom pen up North, so forgive the roughness — I did this one with a mouse). Flatten the document so you have a nice solid black on white image. Then crop it making sure the signature doesn’t stray off the sides or top or bottom. Another way to get the signature in is of course to do it with a real pen (or marker) on paper and scan it in.
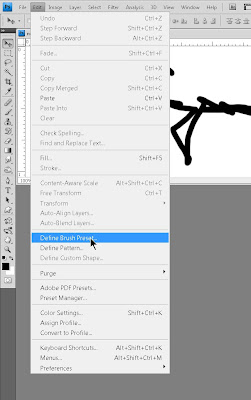
Here comes the tough part. Go up to the “Edit” menu and select “new brush preset”. Give it a creative name (oh, something like “my signature”!) and click “OK”. Believe it or not, you’re done! That brush will now appear at the bottom of the list of brushes available to you and Photoshop automatically saved it for you in your default brushes list.
Cool, or cool? Took me longer to tell you about it than it did to do it!
If you’ve used Photoshop for a while, you have probably used “Actions”, or at least played with them. Here’s how you create them and use them. I do ID photos for a safety course. I set up my camera and lighting and each person steps (OK, sits) in front of the camera and I snap a photo. They’re all basically the same. I need to print them at a specified size and they need to be cropped to a specific spec. I always underexpose a stop or so — they seem to come out better when I work from a darker image and adjust the levels, but the levels adjustment is always about the same. Then I drag the image onto a full-sized sheet (8½ x 11) and print them ganged up. OK, that tells you what I’m trying to do. I used to do them one at a time: open the image, adjust the levels, crop it, save it, drag it onto the print template, go back to the image and close it and go on to the next one. Not too bad a workflow, but I decided I wanted to do it more efficiently. So I created an “Action” to accomplish the same thing and I discovered I cut my processing time in half (literally!) by using it. Here it is. Your mileage may vary, and obviously you’re not trying to do exactly the same thing I am so your action steps will be different from mine. The thing is, though, that the levels adjustment and the cropping is NOT identical for all the images. So I want to stop the action in the middle to let me adjust those things for each image. Here goes:
Now if I were to open another image and click on the “play action” button, it would give me the exact same cropping and levels adjustment I did on the sample image. If I’m not happy with that, and I want to be able to change it before finalizing the action, I need to do one more thing.
Test it. Open another image. Click the “run” button for the action. In my case, it stops to let me adjust the levels, then it continues when I click "OK", and it stops again so I can move or change the cropping box, then it goes on to save the image automatically.  Click image to enlarge Then I drag it into the print template, highlight the image again and hit Ctrl-Shift-W to close it and take me back to Bridge for the next one.
 Print templates. Click image to enlarge Print templates. Click image to enlarge
OK, now get to work. Think how much more efficient you can be! |

Saturday, January 24, 2009


Friday, January 16, 2009
It’s 30 below and all’s well!
Are you out of your mind? Did you not read where I said it’s -30°C? I’m sure the camera would do just fine, but these old bones are not going out there in the middle of the night in these temperatures. I did go out during the day yesterday, to chop some firewood and a short walk, and I did bring the camera, but I failed to capture the essence of the cold. I need a picture of someone bundled up, with their breath condensing in the air and icicles hanging from their nose or beard. However everyone I know is staying indoors where it’s warm.


Does this say "cold" to you? I don't feel like I captured that, although the spiderwebby frost under the eaves is from the condensing vapours from the furnace exhaust. And the icicles say to me, "I hope this isn't going to cause an expensive roof problem!"
So I ventured out and asked someone to pose for me, when I stopped at the bank in Minden. I lied and said I was working for a newspaper... I actually went out knowing in advance what I wanted to shoot, and set it up. I'm not good asking people to pose for me. This guy wanted to know what Newspaper I was working for and I had to assure him he would not be recognizable in the picture.
Except the dog owners, of course. But then I would have to go out at the same time as them and get them to stand still long enough to get their pictures. Oh, and the ice fishermen. I don’t know what’s so attractive about snowmobiling in -30° temperatures, out to a freezing hut and dropping a fishing line into a hole in the ice, when you could just go to IGA and buy some fish if you really wanted some. Again, it’s hard to catch pictures of them from in here by the fire!
I haven’t posted anything here for a while. Mainly because I’ve been (a) working on some projects that has kept my attention and (b) I’ve been lazy, still in “holiday mode”. I haven’t taken a lot of photos in the last while, but as soon as it warms up, I’ll get out there. Actually, there are two people who want me to shoot business type portraits (both of them want them closecut so they can use them on various backgrounds. One wants an overhead shot, holding some test equipment, for use on a flyer). I’ll try to line those up for next week.
The only other thing I’ve done is to frame and put up some prints up at TrueNorth. As I mentioned earlier, I had printed 5 images on canvas, now, how to frame them? Since I didn’t know any better, I didn’t leave enough canvas to stretch them over a frame; so I took the easy way out. I went to Michael’s and bought 5 matching frames. Then I took them apart, threw out the glass and spray-glued the canvases to the back of the matte. That worked. Here’s a photo of the wall with the pictures on it. Hope the arrangement looks good: I don’t like doing things all lined up…

photos arranged on my dining room wall.
One of the projects I mentioned above is the Pixel Painting Workshop that I’m putting together with Hilarie McNeil-Smith. If you’re not in the loop, then you wouldn’t know that the course is over-subscribed by 100%! That means that we have 12 spaces and there are 24 people who want the course! I’m working on Hilarie to schedule a second session, but we’ll have to wait and see when that can be. Probably in the Fall.

OK, it figures. I go out for a walk ONCE without my camera. And two deer walk out of the woods 50m away from me, cross the road, and stop and wait in a little open area. I walked up within about 20m and stood and watched them as they watched me, for at least 15 minutes. AND I DIDN'T HAVE MY CAMERA.
One was a yearling and the other was either a large doe or a buck who had shed his antlers (they do that this time of year). We just stood there and watched one another. I was thinking, OK, that would make a good photo. And that, and that, and... grrr.
I had gone out to bring in some firewood, and knock the icicles down, then I thought I'd watch the sunset over the lake for a couple of minutes and see if anyone was at the ice fishing huts. I thought of bringing it, but I had my arms full with firewood. Oh well, next time. I found where they like to cross and I'll hang out there late in the afternoons.
What else is new? Well, I’ve offered to adopt a dog. Ginger is a 7 year old Golden Retriever and she’s currently in foster care under the auspices of Golden Retriever Rescue. I met her, and I’ve offered to adopt her, but I’m waiting to be contacted for my home inspection (they’re serious about the environment the adopted dogs go into). Should happen in the next couple of weeks.
I’m posting a “silly” picture here. This is the best I can do BEFORE taking Hilarie’s course. She gave me a little guidance (OK, a lot…) but then she sent me a picture showing me “…and this is how you SHOULD do it…”. I’m not posting her picture. Suffice it to say it’s a lot better than mine! She’s an artist. In my dreams, I’d like to be one…

This is Ginger. I'll know in a week or so if she's going to be my dog.
No tip today, except drag out any book you have on Photoshop (including Photoshop User magazine, which you ALL should be getting. Go here to join NAPP, it’s worth it!) and try some stuff. Get really comfortable with layers and adjustment layers and masks. They’re probably the most powerful tools in the program. Oh, and STAY WARM!