FacZen Photography Tips A couple of Photoshop quickies!
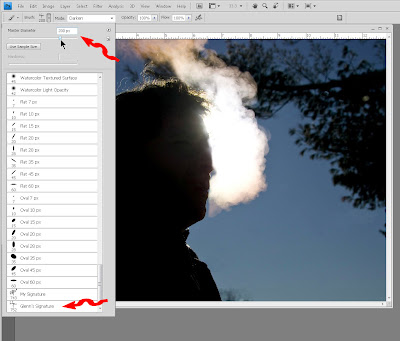
Tip#1: Signing your photographs — This is incredibly simple. I saw it first in the Adobe Photoshop CS3 for Digital Photographers book by Ben Willner. You can create a custom brush in Photoshop, so that you can simply stamp your signature (or copyright notice, or anything else you might want to put on a bunch of images) onto the images. And the beauty is, you can use any of the blending and colouring methods you want to the signature. Start by getting the signature into the computer. One way is to open a new document in Photoshop and sign using a Wacom graphics tablet or equivalent. Make the document a reasonable size (you can crop later) and set the resolution to 300 ppi so you can use it on images you are going to print. Use a nice smooth brush tool — in the example here, I used a 13px hard brush and black ink on a 1000 px wide document (I forgot my Wacom pen up North, so forgive the roughness — I did this one with a mouse). Flatten the document so you have a nice solid black on white image. Then crop it making sure the signature doesn’t stray off the sides or top or bottom. Another way to get the signature in is of course to do it with a real pen (or marker) on paper and scan it in.
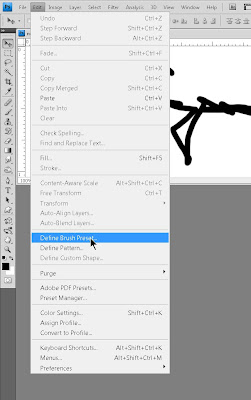
Here comes the tough part. Go up to the “Edit” menu and select “new brush preset”. Give it a creative name (oh, something like “my signature”!) and click “OK”. Believe it or not, you’re done! That brush will now appear at the bottom of the list of brushes available to you and Photoshop automatically saved it for you in your default brushes list.
Cool, or cool? Took me longer to tell you about it than it did to do it!
If you’ve used Photoshop for a while, you have probably used “Actions”, or at least played with them. Here’s how you create them and use them. I do ID photos for a safety course. I set up my camera and lighting and each person steps (OK, sits) in front of the camera and I snap a photo. They’re all basically the same. I need to print them at a specified size and they need to be cropped to a specific spec. I always underexpose a stop or so — they seem to come out better when I work from a darker image and adjust the levels, but the levels adjustment is always about the same. Then I drag the image onto a full-sized sheet (8½ x 11) and print them ganged up. OK, that tells you what I’m trying to do. I used to do them one at a time: open the image, adjust the levels, crop it, save it, drag it onto the print template, go back to the image and close it and go on to the next one. Not too bad a workflow, but I decided I wanted to do it more efficiently. So I created an “Action” to accomplish the same thing and I discovered I cut my processing time in half (literally!) by using it. Here it is. Your mileage may vary, and obviously you’re not trying to do exactly the same thing I am so your action steps will be different from mine. The thing is, though, that the levels adjustment and the cropping is NOT identical for all the images. So I want to stop the action in the middle to let me adjust those things for each image. Here goes:
Now if I were to open another image and click on the “play action” button, it would give me the exact same cropping and levels adjustment I did on the sample image. If I’m not happy with that, and I want to be able to change it before finalizing the action, I need to do one more thing.
Test it. Open another image. Click the “run” button for the action. In my case, it stops to let me adjust the levels, then it continues when I click "OK", and it stops again so I can move or change the cropping box, then it goes on to save the image automatically.  Click image to enlarge Then I drag it into the print template, highlight the image again and hit Ctrl-Shift-W to close it and take me back to Bridge for the next one.
 Print templates. Click image to enlarge Print templates. Click image to enlarge
OK, now get to work. Think how much more efficient you can be! |

Saturday, January 24, 2009


Subscribe to:
Post Comments (Atom)
No comments:
Post a Comment