
I was debating which of two photographic techniques I wanted to talk about today. I haven't been doing much photography over the past few weeks because I've been busy with work and other stuff, but there were a couple of learning experiences I wanted to share.
I decided that a discussion on spiffing up some forest shots in the boring and ugly early spring would be good to do first since it might inspire a few of you to go out and try it, instead of sitting at home bemoaning the fact that the world isn't pretty out there right now.
The other topic worth writing about is a foray into HDR, because the results can be fascinating and the technique is not entirely intuitive. I teased you a couple of weeks ago with an unfinished HDR image, I can document how I did it, but I'll save it for next time.
Before I get into it, I had occasion to shoot the Group photo for the Humber Motorcycle Instructor cadre a couple of weekends ago. I was looking forward to it because I have the new D300 and last year's shot, with the D70 was excellent. I looked forward to surpassing it. I was a little disappointed. Last year's was better. Somehow I managed the perfect exposure last year (I don't mean in terms of f/stop, etc -- I mean the ease of manipulation of the RAW file, the resulting super sharp image). Odd, because I used the same lens, the same camera location. It just showed me that you don't need 12 megapixels to do a sharp 18" wide print. Anyway, here's this year's shot:

As in previous years, I learned that you have to take several exposures when you're doing a group shot. Invariably, someone will have their eyes closed or a funny expression on their face, so you have to have a backup photo that you can clone a face from, etc.
I put some effort into arranging the people this year, according to height. It worked, but I think I'll do something different next time because the group is too big, the photo too wide. I had to clone in all kinds of vegetation around the sides. I'm thinking about shooting from higher overhead, getting people into a more square grouping.
OK: let's get out in the forest!
FacZen Photography Tips A silk purse from a sow's ear!You know that expression, right? In this case, I had the camera out with me and the whole world was just shades of mud, with a sprinkling of snow. So I tried something different, something that I mentioned before: I tried moving the camera during the exposure. Here are a few images I took over the past few days: 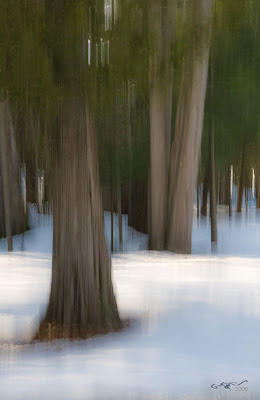
 Early Spring Forest Giant Early Spring Forest Giant
 On the Lake On the LakeSo what do these pictures have in common? Lots of obvious things, but there's one point that really stands out in my mind: No Photoshop!* They aren't even cropped! They are exactly what came out of the camera! All of the effects that you see here were created by moving the camera during the exposure. * OK, not quite. You have to know me better than that! All I did was to open them in Camera Raw, tweak the exposures slightly, REDUCE the clarity to make them softer and increased the vibrance, a minor curves adjustment to the dark tones, then opened them in Photoshop, straightened a couple of them up slightly, added a new layer and stamped my signature and date on, applied a bevel/emboss to the signature layer and reduced its opacity, saved them, flattened them, then saved them again as jpegs. Like I said, no Photoshop! So let's get physical. What do you have to do to capture these kinds of images? There are two main things that effect the kind of results you will get (apart from the obvious, making sure the exposure is right, the composition and focusing on the right spot). They are: shutter speed, and how you move the camera. Of course you know I'm going to tell you to experiment. Digital film is cheap and you might be amazed at the different feeling you get with different techniques, but after some playing around, I decided that for me, an exposure around 1/15 second was the best. Slower than that and you get too much blur and it's hard to control; faster and the effect is too harsh if you can see it at all. I also discovered that you have to move the camera parallel to the direction of the trees. In other words, up and down. But look at the last image. I moved the acmera at about a 30 degree angle for this one. Different effect! So I set the camera so that I would get a good exposure at that speed (some were shot at a very low ISO and some with a very small opening like f/22). Then I focused on the the main object in the picture and as I released the shutter, I swung the camera upwards. Although the rules of composition still apply (rule of thirds, interesting foreground/midground/background, etc), they become less critical because the motion, the "painterly effect" adds an interest of its own. So pictures which would be exceedingly boring, in fact downright ugly what with all that mud and muted colour, become interesting. For what it's worth, I had a couple of these printed as 18x12 images and they're out being framed even as we speak! |

No comments:
Post a Comment