Friday, May 14, 2010

Playing with Photoshop CS-5

It's like being back at school. JUST like being back at school. Oh, wait — I AM back at school! Well, sort of. I'm staying in Residence at Humber College and I'm in a typical college dorm room.

Here's the thing. I was looking for a way to stay overnight in Toronto when I was teaching the motorcycle course at Humber College (I'm not just another pretty face! I ARE a motorsickle instruktor, even tho I can't spel it). Humber rents out residence rooms like hotel rooms during the summer, except at half the price! I thought I'd give it a shot. Reasonably comfortable, very convenient to where I teach, obviously and I was going to say it brings back a lot of memories except I'd be lying because I went to McGill University and we lived in Montreal so I never actually lived in residence. Over the years I've stayed in res a number of times on training courses and whatever, though. The difference is, I seem to be the only one around — it's pretty quiet. Cheap, though.

There's 24/7 security here, no way to sneak someone in if I were of a mind to. Oh, well. What do you want for $30/night? Anyway I'm here for a couple of days, then except for a couple of breaks, for the next two weeks. I miss having coffee and my own bathroom but...

So some interesting stuff. I loaded Photoshop CS5 onto the desktop computer (still running CS4 on this laptop, I haven't had a chance to install it yet) and as soon as I had it up and running, I loaded an image into it to test it, and played with one of its new features: Context-Aware Cloning and Fill. Since I'm not an RTFM kind of person, ("Read the F(*^'in Manual), I looked up enough to find out how to find it, then gave it a shot. What I did was to make a loose selection of an area, then hit shift-f5 and Enter.

Amazing. How the program knows what you want to remove, I don't know, but it does! Here's my first test — I removed the climbers and the plants growing on the canyon wall in under a minute.


This image was taken at a waterfall just off the Blue Ridge Parkway down in North Carolina. I can't remember the name of the place, except that it was just South of Grandfather Mountain and was just a short hike off the road. Click on the pictures to blow them up to see what I did.
Fast forward to yesterday, when I shot a couple of photos in my light tent, to update some images on my First Aid website. I needed a cover picture for my "Consumer Products" section so I gathered a variety of kits and threw them haphazardly in the light tent, fired up the strobes and banged off a few shots. Sure I did. Try, "I made what I thought was a pleasing arrangement", then I fiddled with the camera and flashes until it worked — it didn't right away, something to do with the setting of the flash function in the camera, but I finally got it.

So the intent was to create a floating product shot and since all the other shots on the site are on a blue mottled background, I thought I'd create one. I close-cut the kits, used the "render clouds" filter, colourized the background, threw in a drop shadow and voila!


OK, now don't ask me what I was trying to do next. I have no idea. I think I had just installed Topaz Adjust 4 or at least linked to it in CS5 and wanted to play with it, or I wanted to do something with the background, I don't remember. What I did was to select the products in the image, then selected inverse (so everything else was selected) but I think I had the product selection copied to the clipboard, and I hit shift-f5 and Enter. Holy Water, Batman! Look what happened! I added a couple of Topaz-layers (making sure it worked in CS5) and here's the result!


I liked this image so much that I used it as the cover shot for my Promotional Items section on the website, just the way it is. You have to admit it's cool. OK, you don't have to admit it, but *I* like it. So there.

A couple of days ago, I was watching the birds at the feeder and was amazed at the variety of species that were visiting. The Robins were fighting with the squirrels (amazing how mean they are when they're probably defending a nest), there were chickadees, American Goldfinches, white-breasted nuthatches, a couple of downy woodpeckers and a pair of hairy woodpeckers, white-crowned sparrows, a pair of rose-breasted grosbeaks, some blue jays and common grackles, among others. OK, I'm not all that knowledgeable, I bought a picture book of bird species and when in doubt, visited www.whatbird.com and posted pictures when I couldn't identify something. I still don't know if it was a Wood Thrush or a Brown Thrasher. The grackles are mean. They infested the area in a swarm (everyone knows that it's a "gaggle" of geese but did you know it's a "murder" of crows? Cool, eh?). So I don't know if it's a swarm of grackles but an "infestation" sounds good. They viciously attacked all the other birds and kept them away from the feeder when they wanted to gorge themselves. Fortunately they were easy to scare off, I just had to open the door and they were gone.


So this is what a grackle looks like, although the head and neck colour is more of an irridescent blue and the body is darker than the picture shows. The white flecks in the image are snowflakes. In May. Go figure. 
 

And this is a female grackle. In the animal kingdom, the males are the vividly coloured, showy ones!
The nuthatches kind of hang upside down to feed. Here's one on the Scotch Pine. OK picture except for the twig across the bird.


CS5-time. Let's try the new context-aware healing tool. I kid you not. This edit took a total of 5 seconds. I'm suitably impressed.


So that's my first exposure to CS5. I wonder what other magic it has to offer?
Cheating.
 
Have you ever had trouble getting access to an event or a scene to get pictures?

When I got that shot of the perp being arrested for the jewellery store robbery, i shot from far away with the 200mm lens, although the police let me nearer than I would have thought. The professional looking equipment helped. I was at the scene of an accident a while later -- I threw on a green reflective vest and the cops assumed I belonged there. In fact they shooed away some other sightseers and let me right into the scene. So the secret is, look like, and act like you belong there! It works.

Last summer I wanted to shoot the kayakers at the Canadian Whitewater championships and I was worried that I wouldn't be able to get in, or get close. So I made up a "press" badge. I made a new one this year. Look official?

You can get a bar code off the internet. This one says "photographer". Oh, and when I'm asked who I work for, I say I'm a "Freelancer" but since I've had some pictures published, I add, "the Toronto Star", the "Toronto Sun", "CTV", "Global TV", etc. I'm not lying! They've all bought pictures from me! OK "A picture". LOL


I'd best get to bed. I have to be up at 5:45am to get to a meeting and it's already 2:00. Bye for now!

Friday, May 07, 2010

I've been busy!

Doing what? I'm not really sure. I just know that when I sit down on the couch, I'm more than likely to fall asleep instantaneously, probably because (a) basketball season is over for the Raptors (which means it's actually 11:00pm not 7:00!), (b) because I've seen that episode of Two and a Half Men a couple of times before and (c) because my days are full and getting fuller... I'm good at procrastinating too — I've been seriously considering where I'd like to go for a couple of weeks at the end of June, with Newfoundland and Lake Superior the top two on the list, but I haven't gotten around to committing yet. Soon...

Speaking of "Lists", is this an age-related thing? I find myself making lists. Mostly "To-Do" lists. Today's list has 8 items on it, one of which is "get stuff organized for Toronto trips". I'm going to be spending something like 18 nights in Toronto in the second half of May and beginning of June, and stuff like making sure I have enough socks and underwear weighs heavily on my mind. OK, not heavily... But seriously, did your mother ever say to you, "if your head wasn't screwed on your neck, you'd probably forget that too!" If you were like that when you were a kid, how much worse is it now? By the way, if you're reading this and it's not May 10th yet, you're in luck! Pick up that phone and wish your mom "Happy Mother's Day". If it's already past, then call her and say, "you know, I was thinking about you all day on Sunday but I couldn't get to a phone. Remember when you used to say, if my head wasn't screwed on..." but I digress. (No, I'm not starting that again!).

So what have I been so busy with? Go back and read the first paragraph...

Well I sold my motorcycle and got a new one. My old bike was a long distance touring bike but it is unsuited to riding on dirt and gravel roads, something we have lots of up here in the Haliburton Highlands (technically, I'm in Carnarvon which is just North of Minden which is just West of the village of Haliburton. But nobody's ever heard of Carnarvon or they think it's in England, and this Minden isn't in Germany, so when people ask where I live, I take the easy route and say "Haliburton". If you're from Ontario or most parts of Canada, you've heard of Haliburton. If not... well that's what Google is for!).

My new bike (new to me – it's a 2006) is a Kawasaki KLR 650 which is a dual sport bike which means it's designed for those back roads but you can ride it on the highway as well. Sort of – my butt gets sore after about 100 km, it's not designed for long distance travel. Here's what it looks like:


Notice how this photo was taken from a low angle and that the horizon is not level. That was done on purpose to add a dynamic feeling to the image. Loaded with my camera gear as I go off in search of Trilliums!
which segues me into my first topic: perspective.

Shooting from a different perspective

I've been doing this anyway, but the concept of shooting from a different perspective was brought to the front of my mind as I've been reading and re-reading Scott Kelby's Digital Photography Library (see below). He says it so many times in his books that it was bound to sink in eventually: your photos will be better if you shoot them from a different perspective. If you hold up your camera to your face while you're standing there looking at someone or some thing, your picture will look exactly like what that subject ALWAYS looks like. You always see kids from above. You always see flowers from above. You look straight across at that building (or if it's tall, you look up), or that lake or ocean view. Ho-hum. Boring.

So Kelby says, get down on your knees. Crawl in the mud like a snake. Climb up on a hill or shoot down from a staircase. Remember Dr. Ron's shot of the Humber Instructors from a couple of weeks ago? Always shoot level with or up at flowers and at kids. OK, well there's another rule I want to break from time to time, but do you get the picture? here's a Trillium shot from level with it, and a Hostas shot from down below. Oh, and above is a motorcycle shot from knee level. All better than what they would have been had I shot from standing.


Lighting this shot was a challenge. The sun kept going in and out of the clouds, so I got the flash out, set it to remote and held it in various positions while I shot a bunch of pictures. In the end? The best shot was with no flash, just partial sunlight.

There are other ways of achieving different perspectives. Yessss. You got it before I said it: focal length! In the third book in the series, Kelby says to use your long zoom lens when shooting portraits in the studio! Use that ultra-wide-angle on flowers, but you need to get one really really close to the camera! Now the motorcycle was shot with my point-and-shoot camera, zoomed as wide as it could get which isn't very wide, it's like a 35mm lens on a 35mm camera (or 24mm on my DSLR). The Hostas was shot with my 200mm lens zoomed to about 150mm because I cropped it out of a bigger image and I wasn't re which part of the flower would look best when I shot it.


Another thing: the flower shot was 1/10 sec at f/11. I chose f/11 because it's about the sharpest point on this lens, and because I wanted more depth of field (the smaller the f/stop – the larger the number – the more stuff is in focus in your shot, but you knew that already, right?) and I cranked the ISO down to 100 for minimum noise (or "grain"), which resulted in a slow shutter speed. If you look REALLY closely at the image, you can see some ghosting where the wind moved a flower while the shutter was open. Did I tell you that you have to put the camera on a tripod? Did I have to? Or to use the self-timer or a shutter release cable to avoid shaking the camera? Go back a couple of posts and read about maximizing sharpness. Anyway, I don't have a macro lens, but you can get pretty close to macro using a long lens from further away.

So when you go out shooting pictures, do something different. Richard Martin, I've been told, goes around entering local photo club competitions and his goal is to get the LOWEST possible score. Richard makes great pictures, and he takes great pride in breaking all the rules. Club competitions are about following the rules. If it's a landscape, everything has to be in focus from front to back. There has to be a foreground, middle ground and background. The horizon shall be exactly horizontal and never in the middle. The centre of interest shall be off-centre, following the "rule of thirds". By all means, join a club, enter competitions, strive for great scores, and learn what the rules are. In my mind, you're not an artist if you blindly follow them but you have to know what they are if you want to break them! Make sense? I don't consider myself an artist but I'm trying, and I want to become one. (Feel free to send me stacks of email telling me that I really am one, and a fine one at that, and that I should have more confidence in myself and my abilities and don't stop, and by the way can you buy a signed original print of one of my images or would I care to spend some time for which you will pay to coach you into becoming a better photographer than you are and...)
Let me talk about the Kelby books. And, at the risk of sounding like a broken record, direct you to this site to join NAPP if you want to buy something at a discount or actually learn something. [An aside. The Kelby Photoshop CS5 seminar will be in Toronto on June 10th and you should go if you can. I wish I could go, but I’m teaching that day. I’ve been to two Kelby seminars, one great, one not so great. The one that was not wonderful was directed more at graphic designers than photographers so that was more my fault... It’s pretty cheap for a full day of expert training. $79 if you’re a NAPP member, $99 if you’re not. For info on the seminar, http://kelbytraininglive.com/maximumtour].

So back to the books. I bought the Digital Photography Library — it's 3 slim books in a slipcase for $50 or $60 — around Christmas time and deliberately took this long to read them. As Scott himself says, when you read his books, it's more like he's sitting there beside you when you're shooting pictures saying "hey, try this!" He has a conversational writing style and gets his point across on a very basic level. If fact, this book series states somewhere, "for beginners". OK, then I guess I'm a beginner. Because I've gotten lots and lots of stuff out of these books. On the downside, Scott, if you're reading this or Larry, if you would pass this on to Scott, we don't all have extensive disposable incomes! I know you make the point in the first couple of books that there are various levels of equipment prices addressed, but the third book drops the pretense and tells us that we must have a Grid Spot or a triflector or a 78" scrim (which is ONLY $350 without the stands). I get that your third book shows the equipment that you yourself use, but unless we're all pro's getting paid big bucks to shoot pictures or are independently wealthy, how many of us can afford to have not one, but 2 or 3 Nikon SB-900 flashes for almost $500 EACH? Someone should write a book that says, "here's what the pro's use, here's what they use them for (or why), and here's how you can come close if you're on a budget".

Anyway, the books give you lots of GREAT ideas and you should all go out and buy them. If you're a NAPP member, go here... If not, go here, but it's more expensive there.
High Dynamic Range Photography, or HDR's.

I wrote last time that I was hooked on shooting HDR's and I implied that everyone kind of knows what HDR's are. A couple of emails and at least one phone call tells me that not all of you do. So bear with me a couple of paragraphs while I try to explain it, what it is, why you might want to try it, and how.

If you take a picture of something with a bright sky behind it, what should you expose for? Normally, the subject of the picture, which would make the sky badly overexposed, basically pure white. If you exposed for the sky, to show those fluffy white clouds on a blue background, the object in the foreground would be dark and underexposed. How come, when you look at this scene, you can see both the foreground object and the sky? Because the human eye is a wonderful thing. If you compare the brightness of light to a piano keyboard, the human eye can distinguish 7 octaves, but the camera (whether it is digital or film), only 4. So how do you get a picture with both the sky and the foreground visible? By combining multiple exposures. You sandwich a picture of the foreground, properly exposed with a picture of the sky, properly exposed. It's a tedious process in Photoshop, deciding which things should come from which picture, but you can eventually do it. The HDR process is a software solution that automates that process.

Essentially, HDR compresses that range of 7 octaves of light into 4. Things that would normally be blown out, like bright skies, still show their details and the same is true at the other end, the dark end of the spectrum.

Here's an example.


Photoshop itself has some built-in routines for generating HDR images. But, it is acknowledged, there are better programs out there, and the de facto standard is a program called Photomatix Pro. Once you combine the images, you can change some parameters and completely vary the look and feel of teh resulting combined image.

You can take the resulting image into Photoshop and do some more magic on it. I use a program someone recently introduced me to, called "Topaz Adjust" which lets you do wild and crazy things.

Strictly speaking, this isn't from the same 2 images above: it was made from 5 images, all exposed differently, one stop apart. Topaz works magic with textures and painted surfaces.
Here are a couple more HDR images to show you what they can do.


Now technically, if you shoot in RAW, you can adjust two copies of the same photo to expose details in the light and dark ends of the spectrum, then combine them into an HDR image. Sometimes that works. If you're shooting something with motion in it (people, for instance), that might be your only solution.

Well, that's all for today. It's raining and cold-ish out right now, so I'll likely stay indoors this evening. I want to try to shoot some First Aid Kits in the studio tomorrow, we'll see how they turn out. If the weather turns reasonable, I'll get out on my new bike and see if we can't explore some new roads. I'll be sure to take at least one camera with me!

See y'all later.

Wednesday, April 21, 2010

Trying some new stuff

It’s been a busy time, or actually a make-busy time the past couple of weeks. Business is slow (not just me – the people I talk to in the First Aid industry agree) so I’ve had to spend a lot of time working on making it recover. Adding new products, cleaning up the ones I offer now, working on marketing channels, etc. So I haven’t spent as much time as I’d like on photography.
So if you want to help, you must know people who need really good First Aid kits because the ones we make are Outstanding. If you know someone who has a business, the law requires that they have one but anyone with a home or car or kids or dogs… What about a little kit for photographers? Fits in your camera bag and I’ll put extra sterile gauze pads inside to use wiping down your camera stuff! Go to the FAC First Aid website or email me and I’ll take care of you or your contacts!
Photographically, it’s been an interesting few weeks. I have a bunch of pictures to show you, which might give you some ideas or send you exploring in some new directions. I did some stuff I'm not that used to.

What I tried was (a) using natural light, (b) HDR techniques and (c) shooting birds with the long lens.

I took some shots of my kids and grandkids the other day, using only natural light. I think the best light in the world is what comes through a North-facing window (OK, one shot was at an East-facing window and I don’t see much difference!)

Facing the window. My newest granddaughter Leah

Leah's mom, Maria. She's facing the window, but I'm off to the side. I love this lighting!

Kelly's quartering into the light. Now you don't need to soften the skin on a 6 year old but look how mellow it makes the image!

This picture of Ryan at a chess board made me think about a picture I DIDN’T take last week. I was out for coffee with a friend and noticed a young couple sitting in the coffee shop playing chess. There was such a feeling of intimacy between them and I really wanted to capture that picture but I didn’t because I didn’t want to intrude and because I’m generally shy about asking people if I can shoot them. For two days, I’ve been picturing that shot and regretting that I didn’t get it. So I resolve to try harder to step out of my comfort zone in future. That’s what I meant about exploring new directions. Am I making any sense?

A phone call from a journalist at Sun Media set me going in another direction. This had to do with marketing my First Aid products but in the end he asked me for a product shot which wasn’t in my archives. Well it is Spring, and it’s time to set up my studio which has been parked for the winter! The garage isn’t heated, you see… anyway it spurred me to set it up again to take a couple of product shots.


This is the finished shot.


I took it on the white light tent background but I created a background and added a twist: the helmet is an HDR image. OK, I need to explain that! HDR is a technique that allows a wider than normal range of light levels to be displayed in a photo. It stands for “High Dynamic Range”. You can do it with as little as 2 exposures, one light and one dark and combining them in an appropriate way.

You can even use one picture, if you shoot in RAW because you can adjust the exposure to show details in the shadows and use a second copy of the image where the details in the highlights are shown, then mix the two. There are a bunch of different software packages out there to achieve this, but the benchmark is Photomatix Pro.

Anyway, look at the motorcycle helmet in the picture. Go ahead, click on it to blow it up. Amazing how detailed it is, isn’t it? I didn’t want to do the whole picture that way, so I just stripped in the HDR expanded helmet on a new layer and left the rest of it the way it was exposed in the light tent. The helmet is a combination of 5 different exposures. So in this case I used HDR techniques on PART of a picture.

But even Photomatix doesn’t go far enough sometimes, so there are additional programs like Topaz Adjust 4 which can provide some interesting effects. Thanks to Lance for pointing me in that direction!


This is my outdoor/motorcycle First Aid kit. The helmet is in the shot to give it a sense of size. By the way, there is no table, no reflection: shot in the white tent and everything created! Click on it to blow it up.
I really got interested in HDR’s and the more extreme effects in Topaz (which is a Photoshop plug-in, by the way). Here’s a variety of shots handled in different ways but all HDR.


Some people think this is what HDR is all about. Just look at the detail! The colour depth, the sharpness...

And this is completely different! Textures, motion... this is a false HDR, created from only one image, and two separate treatments on the car and the background in Topaz. Blow this one up. It looks best when viewed big.
...or this cartoon-like treatment with super saturated colours

This is more of a pure HDR expansion of the range of light at dawn. I chose not to expand the shadow areas, the cloud and the reflections in the water are the point of this shot. Here's a case where (I think) the horizon line should be in the centre of the image to give equal importance to the sky and the reflection.
Except for the police car image, I used 5 exposures for each of these shots: ranging from 2 stops underexposed to two stops over. The D300 will do that automatically. The software will compensate for some of the variations when handholding but the best results come from tripod mounting the camera and shooting with precision.

So I'm really taken with the potential of HDR photography. It's going to be hard not to use it all the time!

When Dr. Ron was up here, we drove past an empty osprey nest. I know where there are several of them in the Balsam Lake area. Driving up the other day, I saw that the ospreys are back! I loaded the 400mm lens and learned how difficult it really is to shoot birds on the wing with a long lens. First of all, there’s trying to find it in the viewfinder. Then there’s focus, which is really critical! I ended up shooting about 150 frames and only got about 6 in focus! Autofocus is way too slow, and manual is, well, tough!

Here’s an out-of-focus or at least motion blurred shot of a Canada Goose which I kind of like the dynamic of anyway:


And here’s a picture of an Osprey in flight that actually worked:


I got one shot of it coming in to land at its nest but… out of focus! So I decided to unlimber my painting tools and give it a shot.


Everything you see is created. There is no original photo in this image. I sketched on new blank layers as if I laid tracing paper over the image, then discarded the original image (which was out of focus anyway!). Topaz provided some enhanced colours on the bird and the Photoshop Texturizer provided the canvas. This was done in Photoshop, not Painter 11.
One more picture. This one isn’t mine, but I “art directed” it. Every year I shoot the instructor group picture at Humber College but this year I wanted to make it a bit different. So I invited Dr. Ron to come shoot it and we gave the picture to John Kerns to postprocess. He’s really creative with Photoshop effects. I gave both of them totally free rein: I only told Ron how I wanted to arrange the people in the shot, where to shoot from, what lens to use, what lighting, otherwise he was on his own! Same thing with John! Just kidding. What do you think? Did these guys do a great job, or what!


Well, tomorrow I get my new motorcycle, instructing season starts next week, I'm planning my vacation trip to Newfoundland, the sun is shining, the grass is turning green... trilliums are two weeks away, it's a new season, new beginnings. See y'all!

Monday, March 29, 2010

...but I digress...

Usually I write my blog postings all in one sitting. I’ve already blocked out mentally what I want to write about, then it’s just a matter of putting the words on paper. OK, not paper, on LCD. But paper sounds much better… because it might be a CRT instead of an LCD and technically I’m just putting representations of the words I’m writing on the screen because really I’m storing them in the computer, that is after I hit “save” which is something one should do frequently in case something happens like a power failure or a surge or some sort of electronic glitch or virus or something and all your thoughts are wiped out like using an eraser on a blackboard or more likely a wet cloth because when you use an eraser sometimes you can still reconstruct what was underneath, but I digress.

Today it’s too early to compose it all (see, I wrote “write” it all, then I realized I used the word “write” in the first paragraph so I decided to try to come up with another word to use here or should I say “employ” here because I already utilized the word “use” in this very sentence, but I digress), because I don’t really know yet what I’m going to include in this article and I’m marking time until I think of something, like a drummer or a singer doing an intro to a song and you wonder when the band is going to kick in or the singer take the microphone off the stand and go for that “wow” note (you can tell I’ve been watching American Idol. I’m trying not to be too pitchy…) but I digress.

So I’m having some fun writing this and I hope you will enjoy it and email me to tell me if you did or not and why and give me some kind of feedback so that I don’t feel like I’m hollering into an empty barrel which gives one nothing in return but a sad echo of one’s own voice, something that I don’t have much of these days which they tell me is going to get better but it’s been a long time and it’s very frustrating and if you’ve never met me in person you wouldn’t know what I’m talking about but surgery last summer has taken away most of my regular voice, but I digress.

OK, so let me tell you about what I’m going to tell you about in this piece of writing today (but not really today, as you would have known had you been paying attention in the first two paragraphs).

  • I’m going to point you at some valuable photographic learning resources by reiterating how much NAPP can do for you, yet again;
  • I’m going to show you some pictures I shot this week (well it might not be ‘this’ week depending on how long it takes me to finish creating this commentary which depends on two things: whether I have time to devote to writing and of course to photographing things, and how fluidly my creative juices are flowing, whether it’s like the rushing waters of a cataract in the springtime or more akin to the treacle of maple syrup out of a jar which comes to mind because of the time of year and the fact that the sap is running in the maple trees and the elms and walnuts and oaks too but nobody makes ‘oak syrup’, you have to wonder why but I digr… you know);
  • I’ll talk about my new book — I received my proof copy a couple of days ago.

Why am I so high on NAPP?

Well first let me go on record by saying that NAPP (which stands for the National Association of Photoshop Professionals which can be found at this website which interestingly enough is NOT www.napp.com which takes you to somebody completely different’s website which must be why), does not pay me anything to mention them in this Blog. It would be nice if they did, like, I don’t know, a free pass to next year's Photoshop World Conference and Expo which is going on even as I write this, down in Orlando, Florida while I sit up here in Haliburton looking out at the ice slowly melting off the lake and the brown ugliness of muddy pathways although the birds are coming back and there are the first green shoots poking their little heads out of the ground showing the promise of the spring and summer to come which is of course followed by the spectacularly indulgent colours of autumn, but I d…

I stumbled upon NAPP when I decided to take a one day training course on Photoshop when the travelling seminar team came to Toronto and joining NAPP was a natural thing to do because it gave you a discount on the course and because you could add “National Associations of Photoshop Professionals” to your credentials and the word “Professional” has certain positive connotations. I got 4 things out of that seminar:

  • Some great creative ideas and a look inside some techniques that the ‘professionals’ are using
  • A great book on using and learning Photoshop which I bought that day called “The Adobe Photoshop CS3 (now available for CS4 and soon, CS5) book for Digital Photographers” which sits on my coffee table and which I pick up and leaf through for ideas from time to time even though I’ve read it cover to cover more than once
  • A subscription to Photoshop User magazine which I read religiously whenever it comes in and from which I always get at least one useful tip or technique every issue, and
  • Validation that perhaps I’m not entirely a rank amateur when it comes to using Photoshop although I am humbled daily by the work I see others doing.
I’m a huge Scott Kelby fan. Scott is the founding father of NAPP and the author of many of the books and seminars I’m talking about. He has this incredibly conversational writing style (which I’m semi-automatically emulating, like the way you tend to say “y’all” a lot when you’re in the Southern USA even though you’re from Canada and would much rather be saying ‘youse’ which makes me cringe every time I hear it because you have to wonder how many years the person who just said “youse guys” has spent in Grade 3 and if he ever made it out of public school but I…). Scott doesn’t beat around the bush. He tells you WHAT to do and explains in simple terms WHY you should do it.

So what prompted the scribing of this discourse (coming up with all these synonyms and alternative phrases is fun! I think I’ll do it more. I have to be careful, though because it’s a lot like using 87 different transitions in a ProShow slide show just because they are there, or 7 different fonts on a page just because you can but…)?

Last Christmas I bought myself some new books from NAPP. Two great ones and two not-so-great. You win some and you lose some. To get the less-than-satisfactory ones out of the way, I bought a book on Digital Painting by Bert Montroy which proved to be WAY too technical and niggly for me but would be a great resource for someone more detailed than I, and I bought a subscription to Layers Magazine because they hype it a lot and it turns out that mostly it’s about all the other programs that Adobe makes like Illustrator and InDesign and DreamWeaver and… stuff I don’t use.

The great ones? Thought you’d never ask. “The Adobe Photoshop Lightroom 2 book for Digital Photographers” which did for me the same thing that the CS3 book did for Photoshop and which sits on the coffee table as well and gets leafed through during commercials and when the Raptors are having a bad night (when they are good, they are very very good. When they are bad, they are horrid). And a series of three books called “The Scott Kelby Digital Photography Library Bundle”. I let the latter sit for a while but started reading it yesterday. Suffice it to say that I am inspired to go out and try all the down-to-earth stuff he talks about and I know that I’m about to become a better photographer because of them.

If you’re new at photography, or just got back into digital, or have a thirst for knowledge, or have low self-esteem and think you really don’t know what you’re doing and wish you could shoot better pictures: pick up “The Scott Kelby Digital Photography Library Bundle”. It’s $45 at Kelby Training and worth 5x the price. You can read more about it and order it here.

You can join NAPP by using this link. I lied when I said they don’t pay me anything: no actually I didn’t, but they will give me stuff like a new Nikon D3X or a free upgrade to CS5 (ok, there I go lying again! However if they feel like it, I’d be happy to provide my shipping address…) or extending my Photoshop User subscription by a few months, if you use that link so they know you came to them from me.

OK, I told you about NAPP (again) as I said I would, now let’s take a break and look at a few pictures because if you’re like me and you have the attention span of a rabbit in mating season, I lost you 10 paragraphs ago and you’ve scrolled down in the hope of seeing some interesting images.

I shot the flag again. Remember that ripped Canadian flag overlooking the impromptu ice fishing village on 12 Mile Lake? I shot it again against a blue sky, then did some stuff with the clarity slider and saturation to make it jump out of the page. I dunno. No real use for the picture, but I kind of like it.


I woke up to a fresh dusting of snow, perhaps winter’s last gasp (although as I write this, we went through a night of -15ºC temperatures and it’s -4 right now and someone is coming to see and hopefully buy my motorcycle so that I can get the BMW F650GS that I’ve been looking for so that I can explore some of the dirt and gravel roads around here without worrying about dropping the bike and not being able to pick it up because my knees are really getting to be a problem but I digress…). Anyway, I caught a couple of images that I like by virtue of the extremely sharp and contrasty detail of the skiff of snow on the trees. I made them monochrome, one would almost think they were infrared pictures if one didn’t know better. If you click on the picture it’ll blow up so you can see the detail better.


Later the same day, I was out for a walk (lugging my 70-200 lens; I alternate which lens I bring rather than carrying the whole bag with me) and the moon caught my eye, sort of nestled in some branches. Actually, there were some red-winged blackbirds perched on the treetops and I was trying to get one of them in flight in front of the moon but failed miserably because I wasn’t ready when they took off. Shot the moon anyway, but I realized that even though the branches were a hundred meters away, that wasn’t infinity, and the branches and the moon were not both in focus at the same time, even though I shot at f/11. So I took 2 pictures and overlaid them. OK, I blew up the moon a bit as well. Amazing how much detail comes out when the moon isn’t in a black sky. Click on it to blow it up and see. I wonder why?


Everyone tends to overexpose moon shots. I’ll go out on a clear night maybe this week, and try again at night, but I’ll shoot the same exposure: 1/200 second at f/11, ISO 400. Let’s see what I get.


OK, I did go out again, and that’s what I got. And the exposure was equivalent: f/8 at 1/200 sec, ISO 200, 70-200mm lens with the 2x teleconverter mounted.. I didn’t exactly shoot this at night, it was still light out. What’s interesting about this picture is the fact that I followed the tips that Scott Kelby gave in the book I mentioned above to make sharp pictures,

It works! If you do as many of these things as possible or you're conscious of what affects sharpness, I guarantee you, you'll get sharper pictures!
1. Put the camera on a tripod. Even if you think you're shooting at a high enough shutter speed, put your camera on a tripod.
2. Shoot at a higher shutter speed. You may have to adjust the ISO or the lens opening to make that happen.
3. Turn off the VR. If you have a lens with Vibration Reduction or Image Stabilization, turn it off. There's a little motor in there trying to compensate for any vibration and when there is none (like on a tripod), it creates some just for the Hell of it.
4. turn off autofocus. Another little motor doing stuff.
5. shoot with a cable release. You can't help but shake the camera when you press the shutter release. The modern DSLRs have electronic releases that are better than the old mechanical ones. 
6. Or you can use the self-timer. Set it for a minimum of 5 seconds to give vibration time to die down before the shutter releases. 
7. If you can, put the mirror up before the shot. Again, it reduces things moving around when the picture is taken. Read your owner's manual if you're not sure how to do that.
8. Shoot at the lens's sweet spot. Usually it's about 2 or 3 stops down from wide open -- for an f/2.8 lens, that wound be at f/5.6 or f/8; for an f/5.6 lens, somewhere around f/11 or f/16.


Here's another image I did today by following some of these rules. I couldn't use the timer, of course, or lock the mirror up because I had to manually focus. I had the camera on the tripod, shot 1/160 sec at f/9, ISO 800 with the 400mm lens (2oo+telextender), a little off the sweet spot but the best compromise I could find. I used the cable release and fired a burst of 3 or 4 shots (I think the mirror stays up between shots in a burst). There's a little noise in the image because of the high ISO, but it only appears at big magnifications.


Male White-breasted Nuthatch (Sitta carolinensis) at the feeder
My book needs a little work.

Not too much, though. The biggest thing is the missing copyright information, which was probably my mistake but who knows? Second is the cover. I made an image wrap cover instead of a jacket. I used a black background which I’m guessing leached through the two pictures on the cover because they are WAY too dark. Before I adjust them, I’ll ask Blurb what to do. Also, the cover appears “smudgy”. Almost as if it had been handled a lot, but it hasn’t. Inside, there are a couple of pictures that need touching up – one where the signature is cropped partly off, one that needs to be lightened a bit. And there is at least one page I don’t like, so I might change a couple of images.

All in all, though, it’s quite satisfactory. It’s a pretty good representation of where I’m at today and how I got here.

Oh. I remember mentioning that I didn’t fit the images exactly to the ‘containers’ on the pages. I made sure I had enough resolution and that I wasn’t doing extreme reductions. I have to look through it again, but I didn’t find a single artifact (pixellated digital stuff that shouldn’t be there). If you’re doing a Blurb book, you don’t have to be so niggly but YMMV (which stands for “your mileage may vary” which means that if you do what I said and it doesn’t turn out, it’s YOUR fault, not MY fault!).

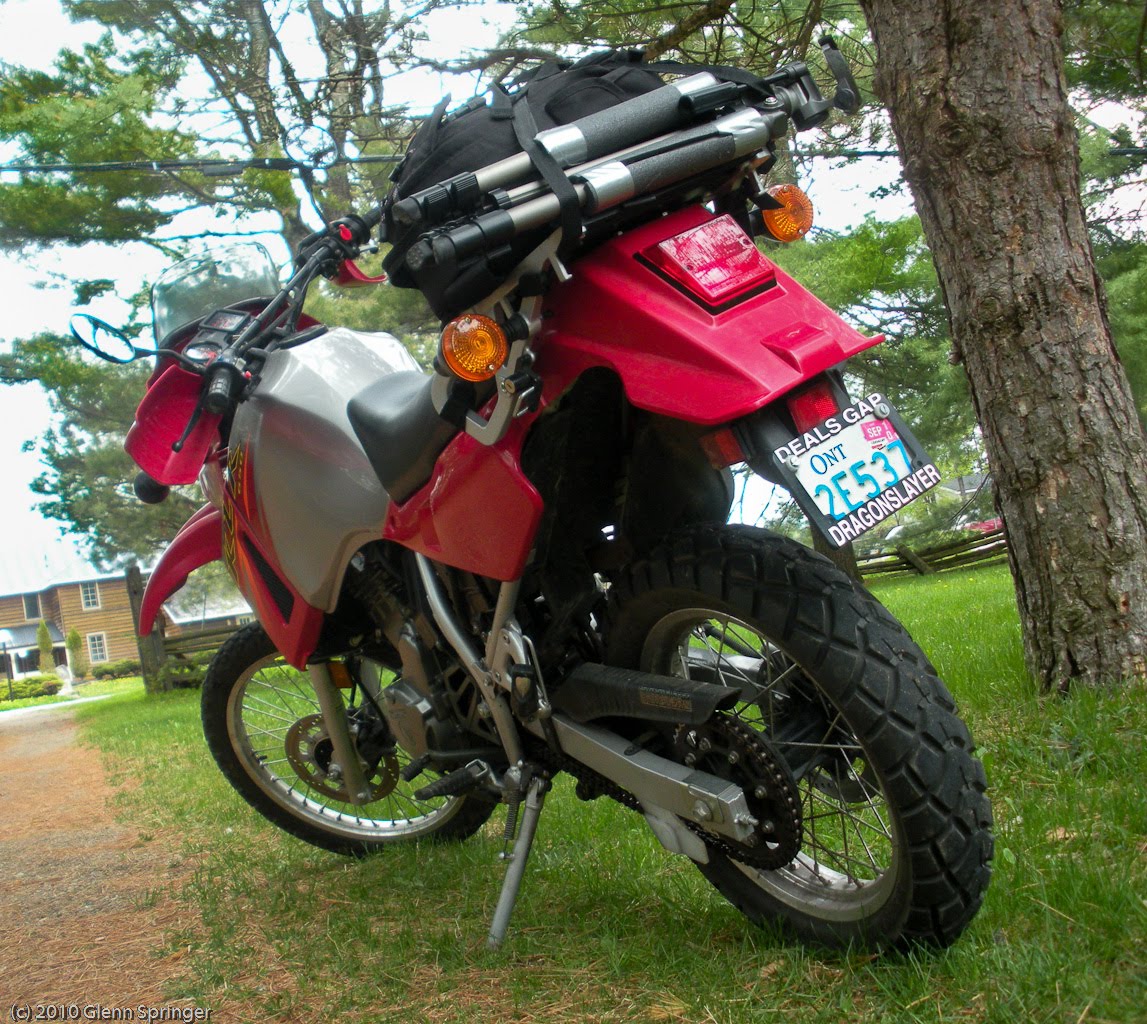
BTW, I did sell my motorcycle. I have to bring it into Toronto next weekend to get it safetied and new tires for the new owner, but it’s gone, it’s a deal. I’m going to miss the beast. Here are a few shots.


In Newfoundland. At Cape Spear (the easternmost point in North America) and somewhere on Fogo Island which the Flat Earth Society recognizes as one of the four corners of the Earth.


Up in the Haliburton Highlands. The spring shot is opposite my dock on 12 Mile Lake, the fall shot along Highway 35 just South of here.


These photos were taken by "Killboy" at Deal's Gap on the North Carolina/Tennessee border. This portion of Route 129 is known as "The Tail of the Dragon". There are 318 turns in 11 miles and it's mecca for motorcyclists in North America. As I write this, it's closed down by a rockslide that will take several months to clear. In case you were wondering, that's me. On my now sold ST-1100.

Catch you all next time! I'll be talking about what I do to get inspired.

Tuesday, March 23, 2010

Did you miss me?

After I finished the fourth Lightroom article, I had to pay some attention to other things. So I haven't posted in a while. A few things did happen in the meantime...


Note: I added this little section after the fact. I had a few calls about the Lightroom articles so I wanted to make a quick response here. The articles don't "Teach" LR. They just summarize a few of the features and pitfalls for thos contemplating getting their feet wet in LR or who are new at it and are lost. The articles are supposed to be read in order, 1 to 4, but the nature of this blog means that they're posted in reverse and in fact, the first article has fallen off the bottom. Here's what to do: click on February in the Blog Archive at right (not in the screen capture below!)  to expand it, then click on the article itself, starting with #1 at the bottom.,


It's nice to be recognized!

Remember the "Mountain Man" image? It seems that some other people liked it as well. In fact it was awarded "BEST PORTRAIT" in the Digital images category at the 2010 GTCCC (Greater Toronto Council of Camera Clubs) Interclub competition. Yesssssssssss! Several people congratulated me, and a couple of them remarked, "OK, so isn't it time you got back to doing some painting? One of them was Hilarie who taught me in the first place. I need to make the time to focus on it and I will. In fact, I have an image in mind that I'd like to work on... news at 11. Which means later. I'm going to make a larger print and get it framed. When the same image won the Richmond Hill print competition last year, I won a free picture framing. If I can still find the award (hmmm. It's somewhere in my computer room!), I'll get it properly framed for display. It's getting hard to find space to display all my award-winning shots! LOL

I wasn't the only one to win an award at the GTCCC's. Irina Popova, Lance Gitter, Fern Gitter, Bud Newton, Robert Fowler and many other RHCC members won awards as well. Hilarie, who I mentioned above, won 4 (four) awards! Including First Place overall in Digital Pictorial. Click this link to look through some really fine examples of the art of photography.

Why I don't shoot pictures for a living
Last week a business colleague/friend asked me to shoot his picture for a business card. I was dumb not to ask how he wanted to use the picture. I came to his house, spent an hour or two shooting then a couple of hours editing before I posted the pictures on Smugmug for him to select. He told me which one, so I spent a couple more hours carefully editing and preparing the picture.Then he emailed me and said, "oh by the way, I want it floating on a transparent background. So much for my careful vignetting of the background. Out comes the old "Extract" tool in Photoshop (which isn't in CS4, you have to go find and download it), and about an hour later I had the close-cut image. Less than perfect, because had I known in advance, I would have chosen a background easier to select from. Then I get, "it appears a little dark...". So I've got to have 5 or 6 hours into this picture, which I'm doing as a favour for free. That's why.

I haven't been shooting pictures.
But that doesn't mean I haven't been doing photography stuff. Sometimes planning shoots and studying other photographers can be very productive too. I ran into photographer Lyn Winans in Minden one day last week. We chatted for a while and exchanged contact information. When I got home, I surfed over to her gallery site and was very impressed with her work. About 300 images up there, and each and every one of them is tack sharp and really well composed. Many of her shots had the "wow" factor that we all strive for. I won't post her pictures, of course but have a look at her gallery. My favourite of her images is this one.

I also invited Dr. Ron to shoot the annual group picture of the Humber College instructors. In previous years, I would set up the camera and run into the picture, which was good for a laugh. But I felt I was getting stale and didn't want to shoot the same shot year after year, so I asked Ron. I gave him a guideline or two, then left it to him. I have to say that I learned a few things — Ron has vision, different from mine (notice I didn't say "better". Ron would disagree with me if I said that but I would be right and he would be wrong. So there.) Anyway, I can't post those pictures here, because they're not ready. I'm sure he'll allow it but you're just going to have to wait and see! There's also an instructor at Humber by the name of John Kerns who is a superb photoeditor so he's going to do that part of the project!

Told you I haven't been shooting.
So this is the fourth topic in the post and still no pictures. Huh. See? Would I lie to you? I shot the FAC course ID photos last weekend and proceeded to drop my flash on the floor. Now it doesn't work (surprise, surprise!). So I need a new one. SB-600 or SB-800. We'll see what I can find at a reasonable price on eBay. So I had to shoot those photos and all I had was the popup flash on the camera. Yuck, to say the least. I duct-taped the Gary Fong diffuser on top of the camera. It helped, but I got some really ugly shadows. You do what you have to do. By turning down the clarity, I got some sort-of acceptable images. So I have to fix or replace that flash quickly.
 
Here's a typical shot with the pop-up flash and diffuser. Before and after clarity adjustment.
 

I think the clarity slider is a great invention.

All right, I lied.
OK, I did go out last week and shoot some photos. However not really with the intention of creating a world-beating image, at least not now. Again, I have an idea about what I want to create and I don't know quite how to do it so I went out to practice. Here's the deal.

I told Dr. Ron that I am contemplating returning to Newfoundland again this summer. We discussed a photo expedition that I was looking into and I told him I had decided not to go with them, for a couple of reasons — first, I looked at the work of the expedition guide and I don't think he has that much to teach me. Second, it's expensive and I could do pretty well everything he was going to do for much less. I told Ron that I had a photo in mind that I wanted to take. He said, "you're going all the way to Newfoundland to get one photo? That's nuts!" This after he told me he hiked 30 miles with a 4x5 camera for 2 pictures. We both realized that this is what it can be all about.

Do you think I'm rambling? Not really, I'm leading up to something. I'm trying to tell you, dear reader, that there's nothing wrong with getting an idea in your mind then going to extremes to achieve it. I want to take a night time exposure involving the sea, some rocks and if I'm lucky, an iceberg. The iceberg thing may not work because they move, so that would screw up the time exposure thing, but I might be able to capture it separately and post-process it together. Anyway, I've got a vision of what I want to capture and a vague idea how to do it, so I have to try it before I go.

I went down to the lake at night and captured this shot of some fast water coming out of a culvert:

Nope. Didn't even come close to working. How do you focus in the dark?

While I was there, I took these so-so interesting images:

Not a forest fire – house lights through the trees

The house across the lake. Tough exposure!

Star shot. The belt of Orion.

I went to the Minden Wildwater Preserve and did some exposures with heavy duty Neutral Density filters in place. I actually managed to do a 1 minute exposure in daylight. Now we're getting somewhere, but it's not ideal. The lens was stopped WAY down to f/32 which doesn't produce the best sharpness (see an earlier post about diffraction effect. Search for "aperture") and all that extra glass on the front of the lens... but the result is getting there. I just need to know how to do this in the dark! Here's the best shot that day:


1 minute exposure at f/32, 100 ISO. I used the 24-120mm lens with an 8xND filter and a polarizer mounted for additional light reduction. As an aside, I remembered to turn off the VR but I didn't remember to turn it back on until just this minute!.
So what am I trying to tell you? By setting a goal and figuring out how to get there, I think I'm taking a step forward. It remains to be seen if I can capture that image I have in mind. I'll be disappointed if I don't but at least I'll have tried.

PS: anyone want to come to Newfoundland at the end of June? Email me.