Wednesday, August 26, 2015

Screaming Heads

Proposal to affect our beloved White Water Preserve

Orillia Power is proposing to build a power generating station at the Minden Wildwater Preserve. I'm not going to go into all the details, you can find them elsewhere, but there is NO DOUBT it will affect this fabulous natural waterway, where the PanAm Games kayak and canoe slalom events were hosted, unique in the world, and a natural treasure.

I wrote a letter to the Minden Hills Town Council who are considering the proposal. I hope it doesn't fall on deaf ears:
There are many arguments for and against the project but I defy you to find one supporting it that does not have a financial aspect. Money will be made if this project goes ahead, by OPG, by those hired to do the work, by others, and likely by the Town of Minden. Fair enough.
I have failed to find even one argument against the project that has anything to do with money. Instead they centre around changes that will affect this precious resource; not only the waterway itself but also the lakes and waters both up- and down-stream. Those who use the white waters for recreation – the kayakers, the fishermen and women, even those who simply wander the banks of the river, explore the caves, watch the trilliums grow in the spring, enjoy nature at its best. There’s no denying that these gifts will be affected if this project goes ahead.
As a photographer and an artist with ties to many outside the community, I often get requests, “I’m thinking of coming up to Minden Hills for a visit, what do you recommend that I see and do?”, number one on my list is to visit the Minden Wild Water Preserve. By far. The gnarly tree roots, the warblers and cedar waxwings flitting through the trees, the pristine trails along the water’s edge… Even in February! The rushing water, leaving filigreed caps of ice on the rocks (the original “Iced Cap!”) Even before the PanAm Games, it was one of the few things that people knew about our area. “You live in Minden? Isn’t that where that fabulous white water falls is located?”. Now, after the event, it’s a calling card for visitors from all over the world to come see our natural beauty.
Who has stood on the side of the Gull river and not thought, “Wow. This is a magical place”?
And now there’s a proposal to take it all away, or at least make it less magical. Shame on Minden Council if you approve this project which will affect our natural treasure for the sake of the almighty dollar.


New Banner Picture


I replaced the banner picture. For the record, here's the old one, since otherwise it disappears into cyberspace!


Topaz ReMask special offer!

The fine folks at Topaz Labs are in the process of updating one of their most effective plugins, "ReMask". If anyone has struggled with making a selection in Photoshop (frizzy, blowaway hair is the best example, but any irregular shape also poses challenges), ReMask is an intuitive, quick and extremely effective tool.

ReMask is designed on one simple idea: To create the best quality mask with minimal input. By using ReMask’s simple 3-color tri-map technology, users have the power to quickly and easily extract even the toughest elements — hair, foliage, and transparent materials — in their photos. The new updates to ReMask 5 make it the most powerful masking software on the market. The two biggest additions are standalone capabilities and background replacement tools.

ReMask 5 works as a standalone program now, in addition to being a plugin. This means no host program is required and Lightroom integration is available. ReMask 5 also allows you to replace and edit the background of your masked image without leaving the program. Choose from transparent, solid color, or image backgrounds.

If you already have ReMask 4, the update is free. If not, you can take advantage of the sale that's now on and purchase it for $49.95, a $20 savings, between now and September 18th!

Here's the link to the ReMask product page. You can try it out for free... but complete your purchase before the 18th to take advantage of the sale price. At checkout, enter the code. "GetReMask5". 

Screaming Heads


Note: this paragraph and picture added after the fact. I realized I never posted a picture of a "Screaming Head", and my intro was rather weak. 


Sometimes an artist's vision is so far out of the mainstream, it defies description. Peter Camani's Screaming Heads project is like that. You have to see the place to get it.


The club had an outing to "Screaming Heads" near Burk's Falls. If you've never heard of it, it's an off-the-wall place, conceived in the creative mind of Peter Camani. You can read more about it here, or Google it to see a variety of videos and other links. There's no simple way to describe it, check out the links. On September 18th weekend, by the way, the "Harvest Festival" will be there, an event which Peter describes as something like Burning Man (Google that if you've never heard of it either!). He expects over 3000 people.


Peter Camani describing some of the features inside his Midlothian Castle home 

As a challenge, I decided to shoot the entire visit with one lens only, my new Nikkor 105mm f/2.8 macro. I changed lenses only once, to do the group shot because I needed a wider angle. Otherwise everything you're about to see was shot with the one lens (although I did crop many of the pictures).


Our group. Missing is Philip Brown who was there but he disappeared sometime in the morning. Hope the witches in the castle didn't get him! I borrowed Jack's neat lightweight MeFoto tripod, set up the camera and used the TriggerTrap for the first time, controlling it with my iPhone. I set it to take a shot every 5 seconds, I did half a dozen or so before wandering back to shut it off.  


Many of my shots were enhanced using various Photoshop tools, such as the Flame Generator here (there were no flames in these old lanterns!). Then I used Topaz Impression to create a painting.


Another painted image (Topaz Impression, "Turner Afternoon" preset). This is essentially a full-frame image, I was challenged by the 105mm lens and couldn't get back far enough to include the whole canoe.  


You could either walk around the pond, or take the human-powered 'ferry' across! Amin is providing the muscle for this crossing. It doesn't take much – I had crossed myself earlier so I could get this shot and I sent the ferry back under the power of a little 5-year old boy! I toned this one similar to Dianne Stender's style. 


Cement and other sculptures dotted the landscape. Enhanced in Topaz Impression, "Impasto" preset. 


Eyes cut in the sculptures made wonderful frames to shoot through! I took some pictures of Chris and Holly looking through some eyeholes, but others have posted those so I didn't.


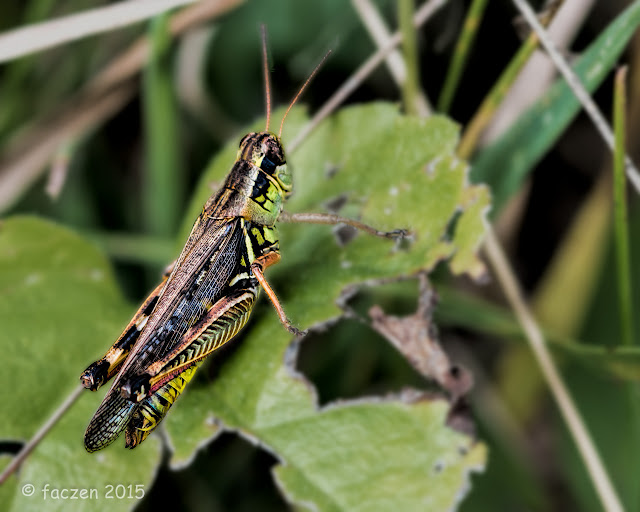
I did say it was a macro lens, right? So I had to shoot this grasshopper... 


...and this wasp or hornet gathering nectar on a goldenrod bloom. 


Amin and Gord hanging out. The 105mm gives an excellent perspective and by the way, it's really sharp! Amin is wearing the new HHCC baseball cap, the shipment came in a couple of days ago if you're a club member.


Christine struck a fashion model pose on one of the sculptures. 


...and so did Holly. 


And Wendy. Very, very rare for me: I did NOTHING to this shot, it's straight out of the camera, not even cropped! 


Another painted image in the style of Degas. I think the composition really works here!

The castle is guarded by this little gnome, hidden in the wall near the gate. At least he was sheltered from the rain (yes, we got caught!). 
And finally, one more shot, taken in their lush garden:


You know I did a little work on this one in Photoshop and Topaz! Told you this is a sharp lens! 

So an excellent day's outing, capped off by a great early dinner on a patio overlooking the river in Huntsville before the drive home. 


— 30 —

Monday, August 17, 2015

The Stars they come stealing at the close of the day


Amazing night in Algonquin Park


I had an adventurous visit to Algonquin Park on Saturday. Nothing physical, I can't do the things I used to do in the past, but a trip that more or less worked the way I planned it. I had intended to go up early evening, scout locations for shooting stars later, shoot a sunset somewhere, probably ending up on the beach at Lake of Two Rivers campground where I would sit in the car on the beach, the same spot Mark and Ron and I visited last September.

The problem with shooting pictures of stars is it only works when there are no clouds. If you live in this part of the world, it's really hard to predict when that will be. There are some sites out there, like www.cleardarksky.com but their forecasts only go out two days (Navigate around their site to find a local observatory. They have 1900 of them in North America. Here's one in Algonquin Park).

I had been hoping that clear skies would coincide with the peak of the Perseid meteor shower, but it was cloudy up there Thursday night. I did shoot some in the Minden area, though. Two nights later, the forecast was for clear skies, But one problem I anticipated was the high humidity, which meant that the camera would "dew" up (sure enough, it did).

Anyway, I headed out on Saturday afternoon, planning to sit there all night. I should have stayed a bit longer than I did, but I was happy anyway! I invited a bunch of friends, but nobody came along, so it was just me, myself and I. I brought my D800 and wide angle lens, heavy duty tripod, cable release, extra batteries, and a handwarmer. You'll see why in a minute. I packed a cooler bag with a couple of sandwiches and some pop, plus a thermos full of hot coffee. I threw a bathing suit and towel in the car, a pair of jeans and a sweatshirt.

In preparation, I had phoned Algonquin Park Information, because I was concerned about the number of visitors to the Park (summer weekend) and wondered if that would interfere with my plans. "Not a problem", I was told, "just be sure to get a day pass". Debbie knows what she's talking about but some of the more junior staff are not on the same page. I also picked her brain, to ask if she knew any spots to suggest. I told her I was looking for a North view, far enough off Highway 60 to avoid light pollution from passing cars.  She suggested a few spots.

The first challenge came when I entered the park and stopped to buy a permit. No such luck. Permits expire at 10pm, and, according to the young lad at the counter, you can't buy a permit for the next day. He's wrong. He said the only overnight permit is for camping which is (1) expensive, (2) I didn't want to camp and (3) all the campgrounds were full so they wouldn't sell me one anyway.

After a fruitless attempt to contact a supervisor, I asked about the fine for not having a permit: $65, the guy told me (wrong. It's actually $155!). But I said, "you have to catch me first"!

UPDATE: I've rewritten the following after another phone conversation with Debbie at Algonquin Park information. 
So here's the deal. They know that some people come in to the Park for stargazing. What you need to do is to buy a two day pass (or two passes) that doesn't expire until the following night at 10. If you get an argument, tell them to look in their computer, it's available. This information is from a park supervisor via Debbie on the info line. With that pass or passes displayed on your dashboard, you should be good.
The rules say you can't be in the Park after 10pm unless you're a registered camper or "other legitimate occupant", and stargazing (or photography) qualifies. If it were me, I would make sure you make them aware of you and what you're planning to do when you buy your permit, or I'd call in advance to go on record. Phone them at 1 705 633 5572 during business hours. Or email debbie.dunn@ontario.ca

Once in the Park, I headed for the suggested spots to scout them out. One didn't pan out, it involved parking in a spot right by the highway and hiking in... (my car would have been ticketed for sure, and anyway, I didn't want to hike in and sit in the bush all night), and one did. I'm going to keep it to myself for now... but it was far enough off the road to make it unlikely I'd be seen, and there was zero light pollution! That's the good news.

Here's the bad news (depending how you look at it): I found out that a large bull moose and a big sow black bear had been seen in that area. Right there.

It was hot and muggy. So I stopped at the Lake of Two Rivers beach for a swim. There was a telephone booth there: I REALLY wanted to change into my bathing suit in a phone booth like Superman, but discretion proved the better part of valour – there were too many people around! Had a great swim – the lake must be spring-fed as its name implies: the water when you get more than a few feet down was c-c-c-cold!

On Highway 60 there was a "Bear Jam". One car spots something and pulls over, five minutes later there's a crowd scene!


One little bear cub, barely visible in the brush, and a riot ensues. I wondered where mama bear was... 

I checked out the campground beach and filed it in the back of my mind as an alternative location to shoot. I'd have to avoid the park rangers, though. While I was there, I took a gratuitous shot of a girl in a bikini...


... and went back along the highway to look for a spot where I could get a sunset picture. I didn't find one, really, but I took this shot:


HDR merge in Lightroom. I liked the warm sunlight on the rocks. 

Off I went to my secret spot where I parked the car out of sight and set up the camera. The built-in compass in the iPhone is really neat, but it was set for "Magnetic North", not "True North". I discovered that just in time when I looked up and saw the big dipper where the camera was pointing instead of Polaris. I moved the car in front of the camera to get a few shots with foreground interest before it got really dark, tried a little light painting but that didn't really work out. The mosquitoes made me retreat back into the car where I sat, waiting for dark.

So here I am, all alone, in the dark, going out to set and reset the camera. In big bull moose and bear territory. "They're more afraid of me than I am of them", I've heard...if you make noise to let them know you are there! Fortunately there was nobody around to offend with my loud singing and harmonica playing.

Looking North, I was disappointed that the skies didn't really look dark. I decided to start capturing a sequence at 10:30. As I said, dew buildup was a concern and about 10 photos in, this is what I got:


pretty useless, right? 

That's what the handwarmer was for. I had read that if you strap it to your lens, it heats it up to prevent the condensation from forming. It didn't seem to actually get warm to the touch – they're designed to work in a confined area – note to self, get some new ones and bring some plastic wrap to enclose it next time. But it did the job or the weather conditions changed enough: no more condensation.

When I looked at the back of the camera, what was all that colour about? I couldn't see it with the naked eye: OH MY! Aurora Borealis. I scrolled back and looked at one of the first images before the lens fogged up:


No words, right? 

So I shot a sequence of a little over 100 exposures over the next hour, which I planned to merge into a star trails image using StarStaX (I came up with another solution too: look below, or click here!). Then I decided to move the camera to face South, so I could capture the Galactic core of the Milky Way.


I did this shot by turning the camera to face South so I could get the car (inside lights on, obviously) and the Milky Way . 30 seconds at f/2.8, ISO 800, 17mm lens. Among other things, the new dehazing filter in Lightroom worked wonders. 

In hindsight, I should have tried some different exposures. Higher ISO made it easier for some photographers I've been following to get more detail out of the Milky Way, with less effort in post-processing. The mosquitos were annoying so I just decided to go with what I had.


This is about the best I've been able to do. I'm not satisfied yet...the Milky Way doesn't stand out enough from the other stars. Just means I have to go back! 

I turned the camera North again but the Aurora had faded. I decided to pack up and go home at around 12:30. By 2 am I was home and uploading images!

I tried to find a couple of ways to show you what it was like there. The first way was with a little 30 second time-lapse video which I posted on my photography.to site. Here's the link. Click it. You'll like it!
Watch the 30 second video clip. If you watch carefully, you'll see seven meteorite events, remnants from the Perseid Meteor Showers. On Thursday night there were over 100/hour, seems to be down to just a few on Saturday.

By the way, the music in the video clip is played by Bob Culbertson on a unique instrument called the "Chapman Stick". It defies description: you should check out this YouTube video

Here's the second way: a StarStaX composite of about 110 images (I deleted the initial 15 fogged up ones)


When you run StarStaX, you can watch the image building. It lays the next image on top of the stack in "lighten" mode which works great for the stars but not so well for the Aurora, because they get muddier and less distinct as each image is added. So when it was all done, I opened the resulting image and stacked in another copy of one of the earlier images, this time in "saturation" mode. Effective, but not as smooth and subtle as a single image like the one further up this blog post.

I think the video is the best way of communicating what it was actually like. Had I stayed longer, I might have been able to do a longer clip that would have done justice to the whole experience. As I said, an excuse to go back again!

— 30 —


Saturday, August 15, 2015

The Stories of Kensington Market

Got that macro lens!

As I mentioned last week, I'm really loving macro. The extension tubes are OK but they force you to choose between macro and regular distances (so when a hummingbird hovered nearby, I couldn't shoot it). I decided to bite the bullet and I bought the Nikon 105mm f/2.8 VR macro lens. Took delivery on Monday, and have only had a chance to shoot a couple of images with it. Here's one:


This image is straight out of the camera. I didn't do ANYTHING to it beyond my normal RAW file import preset in Lightroom, not even crop it.  Well, except for 'spot removing' a couple of blemishes in the flower. 

Did you notice there's a wee spider lurking in the centre of the flower? I didn't, until I looked at it onscreen!


Rogers Wireless. First they refused to admit they had (have) a problem with their tower up here despite the fact that at least a dozen of us have the same symptoms: the audio on incoming calls is breaking up even with 5 full bars of signal strength. Admittedly my iPhone 4s is getting old but I'm not the only one.

Then they offered to charge me almost $400 to upgrade the phone to the iPhone 5s. They tried to sell me on an Android phone. But they couldn't convince me that it would sync with my Outlook calendar and addressbook and sure enough, my own research revealed that it will NOT without third party software, which I would have to purchase.

In the end, they said they'd discount me $75 because I've been a loyal customer for 12 years. Whoopee.


Costco and the good folks at Bell. After waiting hours in Rogers stores with staff who are more concerned with the state of their fingernails and a thimble full of computer knowledge, I left and went to Costco. This for an iPhone 6 not iPhone 5, same plan (plus 50 minutes of US calling), cheaper price AND the phone cost was $149. If I switched to Bell, which I readily did.

20 minutes later I was live, they transferred my existing data from the old phone and I got on the road back up North.

The reason I went with Rogers in the first place was because of mistreatment by Telus and the fact they had no usable signal up here in the Highlands. With Bell, I've got 4 out of 5 bars sitting at my computer. The iPhone 6 is nice, same look and feel as the 4s but faster.

I just ordered this "Tough" iPhone case through RedBubble with my own image on it:


It's a pretty dark image (intentionally), looks good on screen and I hope it will print well. Cost me about 60% of the cost of an Otterbox, by the way.  


In a rut?

Here's a link to a series of ideas/exercises that might drag you out of that funk:

http://petapixel.com/2015/07/16/13-exercises-for-photographers-that-can-help-jump-start-creativity/

...or you could get out of your comfort zone and do something different, like street photography!

Street Photography Outing

Seven strong, we headed down to Kensington Market on Monday. All street photography newbies. We knew that it was supposed to rain around 2pm but we hung in there anyway. Trying to get everyone in the same place at the same time was like herding cats. It can't be done! Holly and Chris were in a 'horticultural' shop, learning how to plant certain kinds of "seeds". Maggie went into another shop and bought earrings. Sharon was doing her own thing. Wendy turned left when we turned right. It was a challenge! Amin and I stayed together most of the time, though.


First thing I shot was an onrushing streetcar on Spadina. Slow shutter speed, zoom while shooting. Kind of trite and overdone, but I like it! The streetcar driver wasn't too happy with me standing on the track in front of his moving vehicle!

Then there was this guy...


He was sitting there, giggling and laughing to himself. There was a lot of that going on in Kensington: I usually get the munchies too, when I get the giggles... anyway he got real serious and gave me the eye when he saw me shooting his picture. 

I didn't want to make it all about shooting characters. I wanted stories. So I actually approached this next guy (after I took his picture!) and asked him, "how do you sound"?


He said, "I don't know, I haven't played in a long time". I'm not sure what he was on but... He asked to see his picture on the camera then wanted me to email it to him! Either he wasn't what he seemed, or he was...

Then the rains came. 


Another guy walking along laughing loudly at some internal joke 


This was one of my favourite pictures of the day.  

But this one tops my list:


Tolerating the rain? Enjoying it? Reveling in it? In a hurry to get out of it? I didn't make this one black and white because I think the colour adds to it. In fact, I might make this the basis of my first attempt to paint a person. 

I have several more images to process from that outing. Hang in there!

Twinkle, Twinkle...

The other night I went out to photograph the Perseid meteor shower. Good news and bad news: I saw lots of meteorites but I didn't capture many on the camera. However I'd like to share two images.


This is a StarStaX composite of 100 images. There are actually four meteorite events visible in the image, look for lines that go in odd directions. But they're lost in the splendour of the star trails. I overlaid one of the foreground images and painted it in Impression

Both of these images are somewhat dark, I hope they render well on your monitor. 


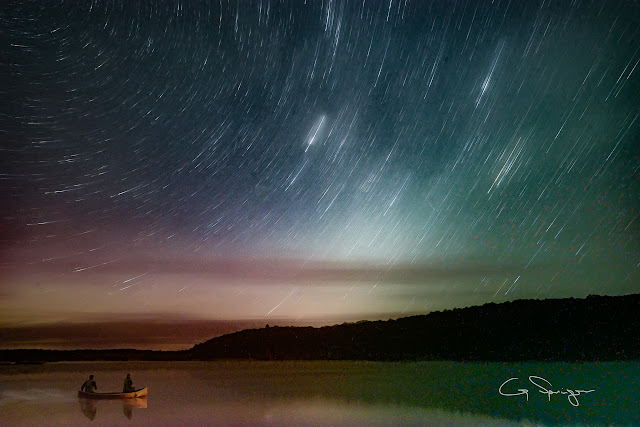
This was a single long exposure (38 minutes). Partway through, I discovered that the lens was covered with dew so I carefully wiped it without moving the camera. The canoe was NOT in the scene: I comped it in after someone on Facebook gave me the idea. But the sky really did look like this, an example of real life emulating art.  

Stay tuned for more next week!

— 30 —

Sunday, August 09, 2015

The "Twirl" and Macro and other fun mid-summer stuff!


What's the deal with all these presets?

Lately I'm reading about all kinds of "Presets for Lightroom" and "Actions for Photoshop". "Get 300 new presets here" or "One-click editing"...

Have I ever used presets? Sure, on occasion, but usually they're ones I developed myself. In fact I use them all the time: every time I import RAW files into Lightroom I save them the same way, I sharpen them, I set the saturation and clarity... all with an import preset that I created. Ditto export presets: I format pictures for the purpose they're being used for (forgive the bad grammar!). I even obtained some presets for processing star images because it does it better than I can, and that's my point: I'll NEVER learn how to do it myself if all I do is click a button.

And what's the difference between these presets and plug-in programs like the ones from Topaz or Nik? Let's see if I can explain it better.

So what's a preset? In Lightroom, you invoke a preset and it moves some of the sliders to pre-determined positions. For example, the preset would choose a certain exposure value, white balance, clarity setting, black and white conversion, etc. Or where to save exported images and what sizes they are.

Seems to me that using presets bears a close relationship to shooting your camera on the dreaded "AUTO" setting. Now maybe I'm just a dinosaur, but it's always been my approach to understand why you do things and basically how it works. If you're a wedding photographer and you need to present a consistent look for hundreds or thousands of images under time pressure, I get it. But I like to work on my images one at a time and put some of my own magic and love into each one. Of course there's a time and a place for them: let's say you made a mistake and overexposed a whole series of pictures: wouldn't it be appropriate to fix one and then sync your adjustment to all the others?

How is that different from using, say, Nik HDR Efex Pro or Topaz Impression? It's a matter of degree. Those programs can accomplish in seconds what it might take you hours or maybe days to do, if you could ever figure out how! Although the presets do the same thing, they're more about applying a consistent look (as decided by the designer) to an image or a bunch of them.

I don't know if I'm making sense here. My argument against presets is the same as the one against using "AUTO" on your camera: the software engineer who developed the camera or the preset is making all the decisions for you.

Don't get me wrong: it's good to have a consistent look and feel in your body of work (if that's what you want!).  People who have decided what they want to be when they grow up have done that. Good for them: but they should do it themselves instead of having someone else do it for them.

Bottom line? "Give a man a fish...". Design your own presets. Understand WHY. It's easy to do and then you put your own fingerprint on your pictures.

That said, "The Twirl"!

Now trending on Facebook: "The Twirl"! It's a relatively simple Photoshop trick that turns this:


into this:


In fairness, the original image isn't a simple one. But when you "Twirl" you can use just about ANY picture! This one was a composite – two images focus-stacked, and I used Topaz Glow on the puffball, but I didn't need to! I chose it because it was 'there'! 

So this was exactly what I said NOT to do in the top article. Except that I'm studying HOW it works so that I can add my own personal touch to it.

Now the argument is that this takes no skill. It's a routine where you more-or-less just push buttons, just like shooting on Auto! And because it was a fad, it took over the Photoshop and Lightroom group for a day or two, some people got disgusted by the overwhelming number of images. Let me say a couple of things (with which you may or may not agree)
  • It's kinda cool
  • It's easy to do if you can follow instructions. Therefore it gets people, who are afraid of Photoshop, to actually try it and experiment
  • You can add your own 'flavour' to it by adjusting some of the parameters and then you can do artistic things like blending in some of the original picture!

Here's a couple of examples.


I simply added the original image as a layer on top, then masked everything except the two seeds. 


I made this from the picture below using exactly the same technique, I painted a mask on the original image after placing it on top of the stack. 


By the way, the Highland Yard was last weekend and I was really NOT happy with my pictures. For one thing, the lighting was horrible with the start/finish in the shade and the rest of the world in bright sunlight.  

So for those of you who would like to know how to do this and give it a try, here are the instructions. Note: you need to have Photoshop. Not Elements, Photoshop. I think the tools were there in earlier versions but I'm not sure since they've been deleted from my computer and I couldn't look and see. I'm using Photoshop CC 2015. Here are the steps:
  1. Open any photo.
  2. Duplicate the background layer (so you have the original for later if you want it). Ctrl-J (Cmd-J on a Mac).
  3. Work on the duplicate layer. Filter → Pixelate → Mezzotint → Medium Lines
  4. Filter → Blur → Radial Blur (set the slider to 100, blur method to 'zoom', quality to 'best')
  5. You can repeat this step a few times if you want. I find it smooths things out. A quick way to repeat it is to hit Ctrl-F (Cmd-F) which runs the same filter you just ran, again.
  6. Duplicate this layer (Ctrl/Cmd-J)
  7. Turn off the duplicate layer and work on the one you duplicated from. Filter → Distort → Twirl (set the angle to 80 as a starting point. You can play with this).
  8. Now turn on the duplicate layer and work on that one. Do exactly the same thing except this time set the angle to the negative of the one you used: "-80°" for example.
  9. Set the blending mode of this layer to "lighten".
  10. Sit back and admire your handiwork.
Like I said, you can now take the original layer and put it on top, then add a layer mask and paint it in (black brush on the mask) or play to your heart's content.

One more example, from an ugly raspberry picture:


PS: I read a GREAT suggestion (I would attribute it if I knew who came up with it). Take a picture of your living room or bedroom. This picture will have a colour palette that exactly matches the room. Now create a 'twirl' image from this picture. Print it HUGE on canvas and hang it over the couch as a colour coordinated piece of art! Brilliant idea that I'm going to try. This might even be a salable concept!

PanAm Games

As many of you know, I shot the PanAm Games Canoe and Kayak Slalom event at the Minden Whitewater Preserve. Lots and lots of pictures! I put them up on my SmugMug site rather than posting them here, so go to http://faczen.smugmug.com/White-Water/PanAm-Games-2015/ to see them. 

Now I was not able to get permission to sell prints for commercial purposes (long story). But several people have asked for pictures including (a) the Canadian Team, (b) the US team, (c) locals whose kids were 'forerunners' – testing the course before the PanAm races (no list exists cross-referencing bib numbers and names. If you are in this group, email me with the bib number and I'll check and see what pictures I got), (d) the parents of Canadian/US team members and (e) people who just liked one or more of my pictures.

If you want a digital download, you're welcome to it at no charge. Just send me an email with the filename off the SmugMug site above. If you want a print, I'll set it up so you can order through my artist website hosted by Fine Art America, but again you have to contact me. The prices just cover costs so it's non-commercial. And FAA will ship worldwide. By the way, you can buy my other fine art images there too: even throw pillows and iPhone cases if you want!

The Macro World

Wow. A whole other set of possibilities. Here's the deal: I ordered, and finally received, a set of extension tubes which convert my lenses into macro lenses. They move the lens away from the camera body so you can focus closer. I bought the ones that have electrical connections so that you can use autofocus and through the lens metering. They cost me all of $40 (US) and came from the Far East, via eBay. Good news and bad news... but first, here's a sample image:


This is my favourite one so far. It's a "hoverfly" or "flower fly" and it's about the same size as an ant, less in length than your fingernail. This IS cropped and yes, I did do some Photoshop enhancement (primarily with Topaz Clarity). I shot this with a 36mm extension tube on my 70-200 lens. Lighting was provided by Mr. Sun, up there in the sky, but I gave it a little help with my ringlight, another inexpensive eBay Chinese purchase.

So now the bad news. You do 'get what you pay for'... there are 3 tubes in the set: 12mm, 20mm and 36mm. They're made of plastic, not metal. The 12mm works fine. The electrical connections on the 20mm don't work so when you look through the lens it's dark if you've stopped down, and autofocus doesn't work (autofocus sucks for macro anyway. You have to focus manually). When I mounted the 36mm/70-200 combo on my tripod, the connection to the camera isn't rock steady so the electrics go in and out. Handheld it's OK and on a lighter lens it's also OK. I wrote to the supplier, I could get a refund but would have to ship it back to get it and the postage cost would be horrendous, so they credited me half my cost (and had the nerve to ask me to give them positive feedback...). So in the end I have usable tubes for $20 or so.

Also: with the extension tube mounted, you can ONLY shoot macro. You can't focus to infinity. But it's so much fun that I decided to bite the bullet and I've arranged to get a REAL macro lens, the Nikon 105mm f/2.8 VR which I should pick up next week. Stay tuned!

In the meantime here are some more macro shots for your enjoyment!


I LOVE wild raspberries. I have a million of them on my property and a couple of quarts frozen in my freezer for mid-winter! 


Here's another fly I shot the first day I got the tubes 


...and a flower I treated with Topaz Impression. Unfortunately I didn't record which preset I used, probably Degas if I remember. 


A black-and-white conversion of a daisy, following the technique that I wrote about a few months ago. 


And finally, a shy grasshopper behind my house. I say 'shy' because he moved away every time I got in range! Got him finally, though. 

Stay tuned for more macro's: they are really a lot of fun. I haven't taken out my light tent yet!

— 30 —