Showing posts with label portraits. Show all posts

Friday, April 27, 2018

But soft! What light from yonder window breaks?

North-Facing Window Light
A random thought about lighting

In response to a question on Facebook, I used Yousuf Karsh as an example of who I'd like to emulate when I grow up. So I leafed through some of his famous portraits and came across one of my favourites, his shot of Albert Einstein (someone else I'd like to be like, and of course never will!).


Because it's someone else's picture, I won't reproduce it here. But please click this link to see the photo I'm talking about.

Photographers spend a lot of money on studio lighting. I get it, if you want to have predictable results all the time but, and I've said this before, all they're doing is trying to emulate natural lighting. For me, the best light is "north facing window light". The window doesn't actually have to face North, it just means that there's no direct sunlight and the window serves as a source of soft light, like the huge reflectors and softboxes most studios prefer.

I remembered this picture I made a few years ago of my ex-girlfriend Rosa's friend Valeria, sitting at her kitchen table. It  was placed in a kind of bay window alcove so light came from the huge windows to her left. It was a freezing cold winter day (I remember it was one of the few days that actually reached 40°C below) in Bancroft, there had been a fresh fall of snow so the world was bright white and all the light came through the window.


I don't think I consciously emulated Karsh's lighting but you have to admit there is a great deal of similarity between this image and his (if you didn't click the link above, please do now).

The only thing I did in terms of light setup was to spread a newspaper on the table in front of her to reflect some of that beautiful light upwards to fill in under her chin.

As I look back in my archives I realize that I love using natural window lighting for portraits. The best example is this one:


This was a digital painting that won me the top portrait prize in the GTCCC some years ago. George was a groundskeeper at a place called "Deep Gorge" in upstate New York and I had asked him to stand by a window. FWIW, I tried to contact him later to get a model release, only to discover that he had died. His co-workers had dedicated a cabin to his memory and I provided a print for the cabin.


My son-in-law preparing my grandson for his graduation dance from 8th grade some years ago. He's now a Seneca College student, preparing for entry to a Canadian Forces program that will hopefully lead to him flying fighter jets. He's also a little taller now, towering over me! 


My neighbour, Vic, in the living room of his house on 12-Mile Lake, illuminated by, you guessed it, North-Facing Window Light. In hindsight, this one emulates the Karsh lighting best, don't you think?


Topaz Labs Spring sale!


Topaz Labs has announced a huge spring sale: 40% off everything in their stores from now until May 7th! That's 40% off their already discounted prices, best prices ever!
Note: if you already own some of the Topaz products, their smart website will calculate a top-up price once you log in. This is an opportunity to get these amazing tools at a huge savings.

If you're not familiar with Topaz, they started with some great plug-in tools for most photoediting apps (my favourite is "Impression" which turns your images into painterly art. Second favourite is DeNoise which quietly does exactly what you think it does!). 

Then they introduced "Studio" which is a FREE standalone photoediting platform on its own (although it can be run out of other apps too: my usual workflow is to call it out of Lightroom). It comes with a number of totally free adjustment tools but they have some premium ones where you can play with them for free but to get full access, you need to buy them. They have a bundle called the "Pro Pack" which gives you everything all in one shot.

You can also get a 30-day free trial of anything through the links below.

Here's the link to Topaz Lab's new FREE "Studio" platform.You can also use this link to access any of the "Pro"-adjustments, plug-ins and special discounts currently in effect. 


For the original plug-ins, here's the link:


No need to enter a coupon code, Topaz will apply the 40% discount automatically.


Steel Wool fun

The other night, the camera club went out to shoot steel wool again. We've done it a few times before, and I ran a session up in Wawa as well— something to do at night if the weatherman wasn't going to cooperate and give us stars to shoot.

What you do is take a bit of steel wool (half a clump?), stick it in a household whisk (the thing you use to beat eggs into submission), tether it with some kind of rope like a dog leash, set it on fire (easy to do with a lighter or even the spark from a 9v battery) and swing it around to paint with light, being really careful not to hit yourself with it or to set the forest on fire. Leave your shutter open for a while. You'll get pictures like this:


This was a 12 second exposure at f/11, ISO 100. 

If you work at it, you can get pictures like this one:


This was about 4 seconds. I zoomed the lens while the shutter was open and I added texture using Topaz Studio. 

or this one:


I edited this in Lightroom. I increased the exposure dramatically and used the "Guided Transform" tool to straighten up the perspective. This image was very well received on Facebook. I did get some comments about the post which  I left in because it adds depth, perspective and tension to the image. Some liked it others didn't. You? 

Now for those of you who don't understand why you need to shoot in RAW...

... here's the "before" shot, straight out of the camera.


If you expose for the burning steel wool, the rest of the image is going to be dark.  

In this case, I increased the exposure by 2½ stops for the overall image. But I wanted the stone fountain to be even more visible so I painted it with the adjustment brush in LR and added another 4 full stops. That's a total of 6½ stops! Try that with a Jpeg.


House still for sale!

Hurry before someone grabs it up! I'm still waiting for those multiple offers they promised me! LOL


Dining Room 

Kitchen

Almost time to put on a bathing suit, your boat in the water, or relax in the gazebo with good company and a good book!

Here's the link to the MLS listing


Carden Plain: too early

With the weird spring (I'm still looking out on remnants of snow from last week!) it was too early to visit Carden Plain and see a wide variety of birds. But it was a nice day yesterday and I made the trek. Nothing exotic but always interesting... I had also intended to head down to the Lindsay area where, I heard, there were meadowlarks in the fields off highway 35. Never made it. I got to Carden a little before noon, and didn't leave there until well after 5, headed to Fenelon Falls for some groceries (I figured there'd be a bigger variety there in the Sobey's — yes but their prices are even higher than here!), then made it home a little before 8. A nice day.

Here are some pix:


I started in Minden and found one of the ubiquitous RWBB's coming in for a one-point landing. Can't resist shooting these guys (until later when there are thousands around!).


Ruffed Grouse crossing Deep Bay Road 


He headed for the base of a tree where he figured I couldn't see him. Almost... 


The bluebirds are back! Only a few of them and they stayed well away, this guy was sitting in a Hawthorne quite some distance away (cropped!) 


A pair of Northern Flickers showed up for a quick look. As did this European Starling.


I ran into a couple of people: first, a team of Conservation Officers out making sure that turkey hunters (season opened the day before) were following the rules... nice folks out of Minden. By the way, unless you have a good AWD vehicle and know how to use it, don't go into the wetland portion of Wylie Road beyond the bridge. Them thar puddles are deep, y'hea?

On the way out, I met a couple of birders who told me they had seen  some Loggerhead Shrikes at the Cameron Ranch. And meadowlarks. So guess where I went? Nope. Not around. There were a couple of small sparrows at a distant Hawthorne, and I heard the meadowlarks, but no joy.

However I managed to convince a couple of Wilson's Snipes to pay me a visit, investigating the sounds my iPhone was making! They posed for a couple of pictures!


One of my favourite birds. 

And so it begins! Next time...


— 30 — 

Monday, October 31, 2011

It's all about RESPECT

Today I want to talk about respect for those who do difficult shots. We all have our comfort zones, and sometimes we step outside them to shoot subjects and situations we're not used to. Every time I do that, I learn a bit more respect for people who shoot in different venues than I do.

I was going to talk about concert shoots first, but I got sidetracked by thinking about other challenging subjects. The first one that came to mind was sports. I've been following Scott Kelby's NFL and NBA images and I'm awed by the technical excellence in his images (how DOES he get them so sharp!!!) and by the challenge of capturing the moment. I did some hockey last winter, at the Ontario Senior Winter Games: that's a tough gig! Dodging pucks and sticks and trying to get the action at the right instant.


You've seen this before if you've been following my blog for a while.


... and this is called "making lemonade out of lemons".

Then there's portraits. I worked with Ron a couple of weeks ago (look back at my last blog post for an image of Kim and her family), and I've done some 'headshot' portraits, actually while playing around with some ID photos I used to shoot. Here's one


Shot with the Gary Fong diffuser on the SB-600 flash, off-camera.
And a lot of post-processing, mostly in Lightroom.

I don't see a ton of emotion in this shot. However last week, shooting at a concert, I took this image of my cousin Steve just as a test of the lighting levels.


Talk about making lemonade! Yes, there's some special post-processing (Nik Color Efex Pro 3 — Polaroid Transfer preset), but I really think this captures Steve. I admit this is luck, not planning!

Concerts. Well I've done a couple: In July I did one up here. I had a dispute with the band who said, "what do you mean you want us to pay you??", so I guess I own the pictures. This one was over the top but I thought it would make a good poster


Crazy lighting and some creative image toning using Topaz Adjust

OK, now check this out: this is Francis Martin of FOG in concert at Hugh's Room last week


Here's where you need to have the right equipment. This was shot at F=24mm, 1/60 second, f/4, ISO 3200. Yes, I said ISO 3200. Nikons are incredibly good at holding the noise down at high ISO but having a faster lens would have helped! Nik Color Efex Pro 3 vignette blur applied.

How DO they do it? Get quality concert shots in lousy or weird lighting? I have great respect for photographers who can do this. Other than "making lemonade" by doing weird post-processing, I don't know how to get good concert shots.

Anyway, I'll leave you with one more image, then I have to get going! Two more sleeps (one of them a short one because I have to leave at 5 am!) and I'm off for the Gales of November workshop with Rob Stimpson up on the shores of Lake Superior. Back after the weekend and I hope to have some good images to share with you.


FOG, onstage. With their signature hat!

Oh yeah! I forgot. I got a chance to shoot with a phenomenal lens this week and wrote about it on my technical blog. Check out the writeup and the pictures there! TTFN...

— 30 —

Tuesday, January 11, 2011

To Move or not to Move... that is the question

Whether 'tis nobler in the mind to suffer
The slings and arrows of outrageous fortune
Or to take arms against a sea of troubles
And by opposing end them.
What has this got to do with the topic at hand? Well, not much but then neither does the title of “Zen, and the Art of Motorcycle Maintenance”, but a lot of motorcyclists bought that book and try to wade their way through the Philosophy of Quality.

I just always liked that quote and it brings me back to the days 50 years ago when I learned it in High School. Mr Hunter would have been proud of me – I never was able to memorize the weekly poems, but some Shakespeare stuck! (I just spent 30 minutes dredging up his name. Ain’t Google wonderful?).

An aside. Anyone from Mount Royal High reading this? Remember Mr. Hunter? He lost his voice, rumour had it playing football when someone stepped with cleats on his neck. I’ve lost much of my voice due to surgery. I feel a kinship...

So, To Move, or not to Move... I took 140–odd pictures and made them into a video which I posted last time. That was the “Moving” one. Then I thought to try it a different way, and I took all 140 images and combined them — a bit at a time: the resulting file would have been GI-NORMOUS — by loading them into layers in Photoshop, changing the blend mode to “lighten” then dragging them all into one document (Photoshop trivia for those who aren’t adept: click on the image, hold the Shift key down and then drag it: it will align exactly). So here’s the non-moving image:


Too many stars. I reduced the brightness and detail level. A lot. Wow. If I’m going to do this again, I’ll use a shorter exposure, because there are just too many stars. But, kiddies, this is how much the Earth moves in 93 minutes.

People Pictures
I’ve said it many times. I take pictures of rocks and trees. First of all, they don’t move, so I can take my time. I never had a problem getting a tree to sign a model release. If you ask a rock to just undo one more button, it never objects. But most of all, when you show a rock its picture, it NEVER tells you it hates it and not to show it to anyone ever.

I can’t say the same thing about people. Maybe I should shoot more people pictures because it’s more challenging. Anyway, last week, I FINALLY shot a picture of a woman who said she actually LIKED the picture! The ultimate compliment! And she said I could post it here and talk about it. Here it is. Thanks, Rosanne!


Shot with my 24-120mm lens set at 58mm, f/5.6 (that’s about 87mm equivalent in 35mm camera terms. Exactly where portraits are supposed to be best! Just luck...). Lighting courtesy of a Gary Fong diffuser on an SB-600 flash mounted on top of the camera.
OK, rule number one: ALWAYS soften the skin of a woman’s picture. Always. Well except if you’re doing a shot of the “hoe lady” (not what you think! Get your mind out of the gutter! The people on the Lake Erie field trip know what I’m talking about – it was the lady with the hoe who came out to chase us off her property. A really colourful farmer lady who cooperated in the end and let us take her picture! With her hoe!), or a gritty homeless person. Always.

Rule number two: NEVER soften the skin of a man’s picture. Men look best when they are rugged and craggy and weathered and look like they haven’t shaved in a couple of days. Like alligators.

Rule number three: rules are, of course, made to be broken. But for the sake of argument...

A woman who is 40 years old wants to look like she did when she was 25. Well unless she... never mind. So there are dozens and dozens of tools, and plug-ins, and programs, and techniques, and tutorials and... that you can buy, on how to soften skin. Read up on them and try them!

What I did in the above image was to open it in Photoshop and create a duplicate layer which I blurred slightly. I added a layer mask which I filled with black, then went back and painted white on the mask in the areas I wanted to adjust. So eyes and lips and hair and teeth, were all masked with black, which means you don’t see that layer in those areas. The only thing revealed was the skin. I used the wonderful healing brush tool in CS5 to remove some lines and creases and I further painted over some areas, especially under the eyes, that appeared darker than the surrounding skin. Just removing bags under the eyes (you didn’t have bags, Rosanne dear. It was the lighting), takes 10 years off. DAB the healing brush, don’t stroke it. It works better.

Now reduce the opacity of the new layer, the one with the adjustments. This is important. If you take the imperfections out completely, you’ll end up with an image that looks like a Playboy centerfold. OK, ok, I know what you’re thinking... but they have ZERO imperfections. They are goddesses. They aren’t REAL. I deliberately left a slightly darker area on Rosanne’s right cheek. It added character and dimension to her face. Look on either side of her mouth, on the right side of her neck. The shadow under her lower lip.

Create another duplicate layer. This time do the opposite – reveal the things that should be sharp and crisp: Eyes. Hair. Teeth. Lips. On this layer, use sharpening, saturation, levels to enhance these features. Most important is the eyes. If you can, go in and paint catchlights and on the opposite side of the iris from the catchlight, a soft light, low-opacity stroke which makes the eye 3-dimensional and a bit moist. Reduce the saturation and increase the brightness on the teeth. But not too much – nobody has fluorescent white teeth (I’m reminded of a Friends episode where Ross overdid the whitening). Go in with a fine brush on a large blowup of the image and get rid of that little piece of lettuce or that area of plaque. Again judiciously use the opacity slider.

Before leaving Photoshop, I created another layer and applied a motion blur to it. I had asked Rosanne to ‘flip’ her hair for me which she obligingly did a few times until I was in sync and could shoot at the right instant. I used a motion blur roughly at the same angle that her hair was flowing. Then I added a layer mask and blocked out her face so that only the areas I wanted were blurred. Use a really soft brush at low opacity on the mask to blend the areas so there’s no obvious transition. By the way, I also added a highlight in her hair, but I ended up cropping most of it out.

OK, back to Lightroom. I reduced the clarity slider a little on the whole image in Lightroom. I wanted even more softness, more luminous glow. Then I used the adjustment brush and redid much of the same softening and sharpening that I had done in Photoshop. The tools in Lightroom are much more subtle.

Now frame the image. The Rule of Thirds says not to put her right in the middle of the picture. I wanted the flowing hair going off to the left of the image, but if I put her way over on the right, she would appear to be moving out of the frame and so would your eyes. Now the cropping of this image was accidental. I happened to click to blow it up to look at something and eureka! This exact framing appeared on the monitor when I blew it up. I loved it, so I copied it. Cropping off the forehead moved her eyes away from dead centre, let me show more of her neck and just a hint of her diamond (!) necklace. I rotated it, too, to an interesting angle.

OK, now read this: Everything I said up to now was complete and utter bullshit (pardon the expression). I am NOT a portrait photographer. I am NOT an artist. Anyone reading this who knows ANYTHING about portrait photography was probably muttering to his or herself, “this guy is full of crap. He doesn’t know what he’s doing”. All true.

Do you like the picture? I don’t care. I like the picture. And more importantly, ROSANNE likes the picture. I just kept painting, kept going, until I liked it. All I did in the paragraphs above, was to describe some of the tools I used to do it. I made a beautiful woman even more beautiful, and that’s what matters.

Rosanne lives half a world away. Maybe I’ll have another chance to photograph her one day. I’ll ask her just to undo one more button, and see what she says!

PS: there’s another took I DID NOT use on this image: liquefy. You can slim someone, move a jawline, enhance a cleavage, make a gluteus not so maximus... try it – it’s fun!

Another NAPP advantage
I found another area on the NAPP site that I’m enjoying: the member forums. But you need to be a member. There are forums for Photoshop, for Lightroom, for Photography, for Graphic Design...there’s even a place where you can upload images and have people comment on them. People ask for advice and opinions and get wonderful answers from real experts (and sometimes from hackers like me). If you want to join NAPP, click on the link on the right side of the page so that I get my ‘brownie points’. Besides you get 10 issues of Photoshop User magazine with your membership. I get something significant out of each and every issue.


That’s it for today, kiddies! Watch for a new look in my Blog, I’m planning to try something out, to focus a bit more on learning topics. Coming soon to a computer near you!


.

Wednesday, April 21, 2010

Trying some new stuff

It’s been a busy time, or actually a make-busy time the past couple of weeks. Business is slow (not just me – the people I talk to in the First Aid industry agree) so I’ve had to spend a lot of time working on making it recover. Adding new products, cleaning up the ones I offer now, working on marketing channels, etc. So I haven’t spent as much time as I’d like on photography.
So if you want to help, you must know people who need really good First Aid kits because the ones we make are Outstanding. If you know someone who has a business, the law requires that they have one but anyone with a home or car or kids or dogs… What about a little kit for photographers? Fits in your camera bag and I’ll put extra sterile gauze pads inside to use wiping down your camera stuff! Go to the FAC First Aid website or email me and I’ll take care of you or your contacts!
Photographically, it’s been an interesting few weeks. I have a bunch of pictures to show you, which might give you some ideas or send you exploring in some new directions. I did some stuff I'm not that used to.

What I tried was (a) using natural light, (b) HDR techniques and (c) shooting birds with the long lens.

I took some shots of my kids and grandkids the other day, using only natural light. I think the best light in the world is what comes through a North-facing window (OK, one shot was at an East-facing window and I don’t see much difference!)

Facing the window. My newest granddaughter Leah

Leah's mom, Maria. She's facing the window, but I'm off to the side. I love this lighting!

Kelly's quartering into the light. Now you don't need to soften the skin on a 6 year old but look how mellow it makes the image!

This picture of Ryan at a chess board made me think about a picture I DIDN’T take last week. I was out for coffee with a friend and noticed a young couple sitting in the coffee shop playing chess. There was such a feeling of intimacy between them and I really wanted to capture that picture but I didn’t because I didn’t want to intrude and because I’m generally shy about asking people if I can shoot them. For two days, I’ve been picturing that shot and regretting that I didn’t get it. So I resolve to try harder to step out of my comfort zone in future. That’s what I meant about exploring new directions. Am I making any sense?

A phone call from a journalist at Sun Media set me going in another direction. This had to do with marketing my First Aid products but in the end he asked me for a product shot which wasn’t in my archives. Well it is Spring, and it’s time to set up my studio which has been parked for the winter! The garage isn’t heated, you see… anyway it spurred me to set it up again to take a couple of product shots.


This is the finished shot.


I took it on the white light tent background but I created a background and added a twist: the helmet is an HDR image. OK, I need to explain that! HDR is a technique that allows a wider than normal range of light levels to be displayed in a photo. It stands for “High Dynamic Range”. You can do it with as little as 2 exposures, one light and one dark and combining them in an appropriate way.

You can even use one picture, if you shoot in RAW because you can adjust the exposure to show details in the shadows and use a second copy of the image where the details in the highlights are shown, then mix the two. There are a bunch of different software packages out there to achieve this, but the benchmark is Photomatix Pro.

Anyway, look at the motorcycle helmet in the picture. Go ahead, click on it to blow it up. Amazing how detailed it is, isn’t it? I didn’t want to do the whole picture that way, so I just stripped in the HDR expanded helmet on a new layer and left the rest of it the way it was exposed in the light tent. The helmet is a combination of 5 different exposures. So in this case I used HDR techniques on PART of a picture.

But even Photomatix doesn’t go far enough sometimes, so there are additional programs like Topaz Adjust 4 which can provide some interesting effects. Thanks to Lance for pointing me in that direction!


This is my outdoor/motorcycle First Aid kit. The helmet is in the shot to give it a sense of size. By the way, there is no table, no reflection: shot in the white tent and everything created! Click on it to blow it up.
I really got interested in HDR’s and the more extreme effects in Topaz (which is a Photoshop plug-in, by the way). Here’s a variety of shots handled in different ways but all HDR.


Some people think this is what HDR is all about. Just look at the detail! The colour depth, the sharpness...

And this is completely different! Textures, motion... this is a false HDR, created from only one image, and two separate treatments on the car and the background in Topaz. Blow this one up. It looks best when viewed big.
...or this cartoon-like treatment with super saturated colours

This is more of a pure HDR expansion of the range of light at dawn. I chose not to expand the shadow areas, the cloud and the reflections in the water are the point of this shot. Here's a case where (I think) the horizon line should be in the centre of the image to give equal importance to the sky and the reflection.
Except for the police car image, I used 5 exposures for each of these shots: ranging from 2 stops underexposed to two stops over. The D300 will do that automatically. The software will compensate for some of the variations when handholding but the best results come from tripod mounting the camera and shooting with precision.

So I'm really taken with the potential of HDR photography. It's going to be hard not to use it all the time!

When Dr. Ron was up here, we drove past an empty osprey nest. I know where there are several of them in the Balsam Lake area. Driving up the other day, I saw that the ospreys are back! I loaded the 400mm lens and learned how difficult it really is to shoot birds on the wing with a long lens. First of all, there’s trying to find it in the viewfinder. Then there’s focus, which is really critical! I ended up shooting about 150 frames and only got about 6 in focus! Autofocus is way too slow, and manual is, well, tough!

Here’s an out-of-focus or at least motion blurred shot of a Canada Goose which I kind of like the dynamic of anyway:


And here’s a picture of an Osprey in flight that actually worked:


I got one shot of it coming in to land at its nest but… out of focus! So I decided to unlimber my painting tools and give it a shot.


Everything you see is created. There is no original photo in this image. I sketched on new blank layers as if I laid tracing paper over the image, then discarded the original image (which was out of focus anyway!). Topaz provided some enhanced colours on the bird and the Photoshop Texturizer provided the canvas. This was done in Photoshop, not Painter 11.
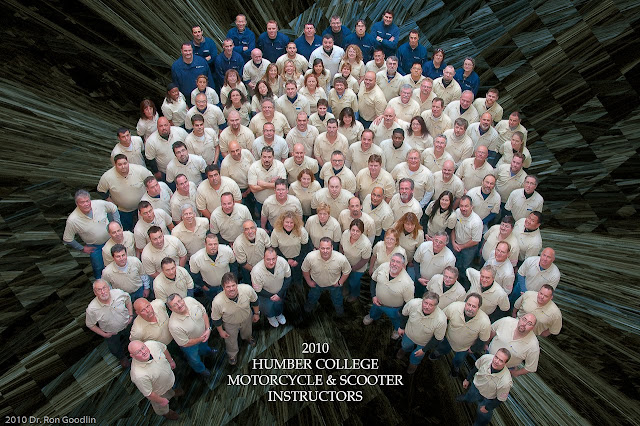
One more picture. This one isn’t mine, but I “art directed” it. Every year I shoot the instructor group picture at Humber College but this year I wanted to make it a bit different. So I invited Dr. Ron to come shoot it and we gave the picture to John Kerns to postprocess. He’s really creative with Photoshop effects. I gave both of them totally free rein: I only told Ron how I wanted to arrange the people in the shot, where to shoot from, what lens to use, what lighting, otherwise he was on his own! Same thing with John! Just kidding. What do you think? Did these guys do a great job, or what!


Well, tomorrow I get my new motorcycle, instructing season starts next week, I'm planning my vacation trip to Newfoundland, the sun is shining, the grass is turning green... trilliums are two weeks away, it's a new season, new beginnings. See y'all!

Wednesday, October 28, 2009

Memory. Wouldn't it be nice to still have some? And some portrait tricks

The older I get, the more I realize I'm losing it. I suppose that's not a bad thing -- when I start not realizing that I'm not remembering stuff, I'll be on that slippery downward slope. My father has an expression: "Everything hurts. Except the stuff that doesn't work". He's pretty well with it for a guy in his 90th year.

Back to me (this is all about me, after all!) and the subject at hand. Sometimes I can't remember what I did 5 minutes ago, never mind last month. Today I'm going to talk about two things: trying to keep track and remembering stuff, and my beginning experimentation with portraits.

Remembering stuff.
Photoshop is such a wonderful program. I think if I keep playing with it for another 20 years (I have been at it that long: I started in 1990. How I wish I had taken some formal training!), I might start to be able to use it in more than a perfunctory manner. I skim the surface. I jump from one tool, one method to another, trying whatever happens to catch my eye or my imagination, then moving on to something else.

The problem is, I might do something once or twice, then not use it again for 6 months, or whenever the mood might strike me. I come across an image and say to myself, "Gee I remember using a similar technique a while ago, I'll bet it'll work well on this image too..." and then for the life of me, I can't remember how I did it. An example? Orton effect. Or doing HDR's. Well I never really mastered that one, but it's still a good example. Here's another one — a big one for me: painting in Painter 11. I spent a whole weekend on a course with Hilarie learning how to use the program and how to paint. I had great visions of becoming a pixel artist. I did a couple of great images (if I do say so myself!), then I didn't use it for 5 or 6 months. I honestly don't remember how.

Or all the great stuff I picked up at the Ben Willmore  Photoshop workshop I attended last year. Or the tips I read about in Photoshop User magazine, try once and say, "that's neat! I'll have to remember that!".

I need to find a way to remember how I did stuff, that I lose if I don't use it regularly. Especially those things that worked well.

Some stuff sticks with you.but only if you keep using it. Like now I remember that hitting alt-backspace will paste the foreground colour into the selection of an image. Or the "X" key switches between foreground and background colours. Or the Ruler Tool is now hiding under the eyedropper. But a lot of the time, I just can't remember what I did to achieve a certain effect. For example, the picture of the Empire State building which I posted a couple of weeks ago: I would have liked to have the base and the background of the building shrouded in fog. I remember that last year, I created a fog effect on an image by using a layer mask, and I think I used a gradient to make it happen, but damned if I can remember how.

Get to the point. Make a long story short (too late!). I'm going to start writing down what I've done to images when it works out well. That way I can go back and use the technique again months later. Photoshop has a tool which helps you do that: the "History Log" (access it under General Preferences). It will tell you, stroke by stroke, what you did on an image and you can either create a separate text file or store it in the metadata for an image. How useful is it? So-so. It's very detailed. Here's an quick example:

2009-10-28T10:08:39-04:00 File soft kelly-72.jpg opened
Open C:\Users\faczen\Pictures\Blog 1000\soft kelly-72.jpg

Hue/Saturation 1 Layer
Make adjustment layer Using: adjustment layer
Type: hue/saturation
Preset Kind: Default
Without Colorize

Modify Hue/Saturation Layer
Set current adjustment layer To: hue/saturation
Preset Kind: Custom
Adjustment: hue/saturation adjustment list
hue/saturation adjustment
Hue: 0
Saturation: 32
Lightness: 0

Merge Visible
2009-10-28T10:18:09-04:00 File C:\Users\faczen\Pictures\Blog 1000\soft kelly-72.jpg saved
Save
 OK, it helps, but it's not good enough to remind me "how" I did something, just "what". So what I decided to do is to create some text files to describe what I've done when I want to remember a technique. Not in incredible detail like the above, but follow the comments I'm making on the following image. I'm doing this on the fly: writing it as I create this Blog post.:


You need to blow this up to see the detail of the changes between the before and after of this portrait. Click on the image. I'll wait right here until you come back.
A little background: I shoot headshots of students in a certain safety course every month. I've mentioned this before. I need to print a 2"x3" photo for them to submit to the Government for their ID. I shoot about 30 or 40 pictures in half an hour, then I spend an hour or so outputting them. I do the same thing all the time, so I created an "action" in Photoshop to accelerate the workflow: It opens the image, then opens a levels dialogue so I can adjust the brightness, etc. Then it opens a cropping dialogue so I can crop the image to the exact size I want. It sharpens it and saves the file. All 30 or 40 pictures are done the same way. Then I place them 15-up on a sheet and print them on a Canon inkjet printer and trim them out. I need to remember to turn the saturation down about 10% and move the hue up about 5 points because my printer still doesn't match my computer screen no matter how hard I try. The images aren't very flattering, but they're not half-bad. Sometimes I'll clean up some blemishes before starting the action, and sometimes I'll stop it before the sharpening, especially for women whose images should be a bit softer than guys. The left-hand picture is exactly what comes out after the action is completed, except for size.
 A sidebar. These pictures are taken with the D300 and the 24-120mm lens, usually zoomed to about 100mm. I use the SB-600 flash with the Gary Fong diffuser attached, the exposure is on Manual at 1/100 sec at f/11, ISO 400, although I'll open up a bit if the subject has dark skin. The resulting photo is about 1 stop underexposed so no hilites are blown out. I get the students to sit in a chair facing about 30° to the left, then turn their heads over their left shoulders and look at the camera (I need both ears in these shots).
 I opened the image, but in Camera Raw, not immediately in Photoshop. In a conversation with Dr. Ron I had learned that a technique for creating smooth, glowing skin in portraits was to reduce the clarity (move the slider to the left) and I wanted to try it. I actually reduced it quite a bit, to -65%. Then I opened it in Photoshop and at the same time, I opened the original image as well. I dragged the smoothed version (low clarity) into the original image to put it on a new layer. Why? Well because I wanted to retain the detail in the hair and eyes, etc so I was planning to overlay the two versions.

Next, I removed blemishes, using the Healing Brush. I worked on both layers. It was easier on the smooth layer because a lot of the blemishes were gone anyway. I created a layer mask  on the smooth layer and started painting out the things I wanted to retain from the original image: the hair, the eyes, the mouth. I like adding soft hilites in the eyes, so I duplicated the background layer and painted hilites at the bottoms of the irises using a soft chalk brush at about 25% opacity. I reduced the opacity of this layer to about 60% before merging it down so that the hilites would blend in better.There was a strand of hair over the left eye which I cloned out carefully on both layers. The hair was a little too bright, so I used the Burn tool to bring it down a little. I saved the image as a .psd file, then flattened it and saved it as a .jpg. Done, except for resizing it up slightly for this Blog, and putting the before and after on one file.

So this was a pretty simple technique (if you're a Photoshopper, you'll know what I mean. If not, you'll think this was crazy overkill!). But unless I do some more portraits in the next months, I'll forget what I did so I'm going to copy what I just wrote, from the picture on down, and save it in a Word file to retrieve when I want to remember. Back in a sec... ok, done. The filename is "Soft portraits using the Clarity slider".

OK. The lesson here is, it's never too late to start recording things so that you'll remember them later. Start today. If someone asks "how did you do that?", you can tell them. If you want to do it again, you can look it up and see what you did. I plan to start today, recording successful activities. I'll come back in 6 months and tell you how it went.

Two more images before I leave you today. I was working on a picture I took of my 6-year old granddaughter Kelly a couple of days ago (just getting a feel for the same technique) and I had created a layer mask. In order to refine it, after painting on it, I alt-clicked on the mask so I could see it directly and this is what I saw:


Does that look like the sketch of a 6-year old? Bizarre. Is that what she's going to look like when she's 20? Hope I'm around to see the beautiful young lady I just portrayed!

And finally here's a fall shot I just happen to like. Hope you like it too!


This looks really different on a white background.
Click the picture to enlarge it and view it on white.
You can see more of my stuff, of course, by going to my Smugmug gallery. Everything is organized by month, although I have to do some work on the site to move some things around and hilite the images that I happen to like best!

TTFN!