Showing posts with label maria. Show all posts

Wednesday, April 21, 2010

Trying some new stuff

It’s been a busy time, or actually a make-busy time the past couple of weeks. Business is slow (not just me – the people I talk to in the First Aid industry agree) so I’ve had to spend a lot of time working on making it recover. Adding new products, cleaning up the ones I offer now, working on marketing channels, etc. So I haven’t spent as much time as I’d like on photography.
So if you want to help, you must know people who need really good First Aid kits because the ones we make are Outstanding. If you know someone who has a business, the law requires that they have one but anyone with a home or car or kids or dogs… What about a little kit for photographers? Fits in your camera bag and I’ll put extra sterile gauze pads inside to use wiping down your camera stuff! Go to the FAC First Aid website or email me and I’ll take care of you or your contacts!
Photographically, it’s been an interesting few weeks. I have a bunch of pictures to show you, which might give you some ideas or send you exploring in some new directions. I did some stuff I'm not that used to.

What I tried was (a) using natural light, (b) HDR techniques and (c) shooting birds with the long lens.

I took some shots of my kids and grandkids the other day, using only natural light. I think the best light in the world is what comes through a North-facing window (OK, one shot was at an East-facing window and I don’t see much difference!)

Facing the window. My newest granddaughter Leah

Leah's mom, Maria. She's facing the window, but I'm off to the side. I love this lighting!

Kelly's quartering into the light. Now you don't need to soften the skin on a 6 year old but look how mellow it makes the image!

This picture of Ryan at a chess board made me think about a picture I DIDN’T take last week. I was out for coffee with a friend and noticed a young couple sitting in the coffee shop playing chess. There was such a feeling of intimacy between them and I really wanted to capture that picture but I didn’t because I didn’t want to intrude and because I’m generally shy about asking people if I can shoot them. For two days, I’ve been picturing that shot and regretting that I didn’t get it. So I resolve to try harder to step out of my comfort zone in future. That’s what I meant about exploring new directions. Am I making any sense?

A phone call from a journalist at Sun Media set me going in another direction. This had to do with marketing my First Aid products but in the end he asked me for a product shot which wasn’t in my archives. Well it is Spring, and it’s time to set up my studio which has been parked for the winter! The garage isn’t heated, you see… anyway it spurred me to set it up again to take a couple of product shots.


This is the finished shot.


I took it on the white light tent background but I created a background and added a twist: the helmet is an HDR image. OK, I need to explain that! HDR is a technique that allows a wider than normal range of light levels to be displayed in a photo. It stands for “High Dynamic Range”. You can do it with as little as 2 exposures, one light and one dark and combining them in an appropriate way.

You can even use one picture, if you shoot in RAW because you can adjust the exposure to show details in the shadows and use a second copy of the image where the details in the highlights are shown, then mix the two. There are a bunch of different software packages out there to achieve this, but the benchmark is Photomatix Pro.

Anyway, look at the motorcycle helmet in the picture. Go ahead, click on it to blow it up. Amazing how detailed it is, isn’t it? I didn’t want to do the whole picture that way, so I just stripped in the HDR expanded helmet on a new layer and left the rest of it the way it was exposed in the light tent. The helmet is a combination of 5 different exposures. So in this case I used HDR techniques on PART of a picture.

But even Photomatix doesn’t go far enough sometimes, so there are additional programs like Topaz Adjust 4 which can provide some interesting effects. Thanks to Lance for pointing me in that direction!


This is my outdoor/motorcycle First Aid kit. The helmet is in the shot to give it a sense of size. By the way, there is no table, no reflection: shot in the white tent and everything created! Click on it to blow it up.
I really got interested in HDR’s and the more extreme effects in Topaz (which is a Photoshop plug-in, by the way). Here’s a variety of shots handled in different ways but all HDR.


Some people think this is what HDR is all about. Just look at the detail! The colour depth, the sharpness...

And this is completely different! Textures, motion... this is a false HDR, created from only one image, and two separate treatments on the car and the background in Topaz. Blow this one up. It looks best when viewed big.
...or this cartoon-like treatment with super saturated colours

This is more of a pure HDR expansion of the range of light at dawn. I chose not to expand the shadow areas, the cloud and the reflections in the water are the point of this shot. Here's a case where (I think) the horizon line should be in the centre of the image to give equal importance to the sky and the reflection.
Except for the police car image, I used 5 exposures for each of these shots: ranging from 2 stops underexposed to two stops over. The D300 will do that automatically. The software will compensate for some of the variations when handholding but the best results come from tripod mounting the camera and shooting with precision.

So I'm really taken with the potential of HDR photography. It's going to be hard not to use it all the time!

When Dr. Ron was up here, we drove past an empty osprey nest. I know where there are several of them in the Balsam Lake area. Driving up the other day, I saw that the ospreys are back! I loaded the 400mm lens and learned how difficult it really is to shoot birds on the wing with a long lens. First of all, there’s trying to find it in the viewfinder. Then there’s focus, which is really critical! I ended up shooting about 150 frames and only got about 6 in focus! Autofocus is way too slow, and manual is, well, tough!

Here’s an out-of-focus or at least motion blurred shot of a Canada Goose which I kind of like the dynamic of anyway:


And here’s a picture of an Osprey in flight that actually worked:


I got one shot of it coming in to land at its nest but… out of focus! So I decided to unlimber my painting tools and give it a shot.


Everything you see is created. There is no original photo in this image. I sketched on new blank layers as if I laid tracing paper over the image, then discarded the original image (which was out of focus anyway!). Topaz provided some enhanced colours on the bird and the Photoshop Texturizer provided the canvas. This was done in Photoshop, not Painter 11.
One more picture. This one isn’t mine, but I “art directed” it. Every year I shoot the instructor group picture at Humber College but this year I wanted to make it a bit different. So I invited Dr. Ron to come shoot it and we gave the picture to John Kerns to postprocess. He’s really creative with Photoshop effects. I gave both of them totally free rein: I only told Ron how I wanted to arrange the people in the shot, where to shoot from, what lens to use, what lighting, otherwise he was on his own! Same thing with John! Just kidding. What do you think? Did these guys do a great job, or what!
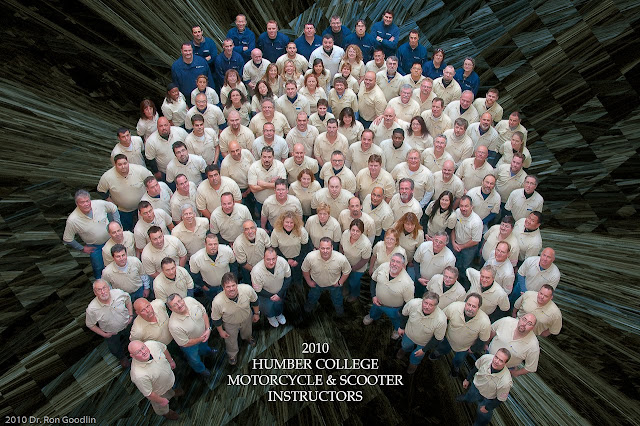


Well, tomorrow I get my new motorcycle, instructing season starts next week, I'm planning my vacation trip to Newfoundland, the sun is shining, the grass is turning green... trilliums are two weeks away, it's a new season, new beginnings. See y'all!

Thursday, December 03, 2009

It's not "IF", it's "WHEN"

Did you miss me? It's been a while since I posted, but as you might have guessed from the title, I suffered a computer crash. My other excuses involve some medical issues and some work stuff that's kept me busy for the past couple of weeks. So not only haven't I posted anything, I've hardly pushed a shuitter release in the last month. I do have a couple of things to talk about and show you, though.

So in today's post, I'll talk about being prepared for that big day when your computer crashes, share some new purchases with you and show you a few images. Fair enough? Let's get going!

When your computer crashes.
As I said above, it is inevitable. Your computer is going to crash. Everybody pretends it only happens to someone else, never to you, but ignoring the fact that it WILL crash isn't smart. You have to be prepared.

I lost zero data. None. But then the computer that I use most of the time wasn't the one that crashed, it was my old desktop. I brought it up North about a month ago. The other day I walked into my computer room (OK, my third bedroom/office) and booted the machine, or tried to, because my scanner was hooked up to it. "Blue Screen of Death". Then nothing: "please insert a boot disk...". The hard drive was toast. My computer guy (Bob, the Greek Geek. He's really good: contact him or check out his website and be sure to tell him I sent you!) had a look at it and told me it wasn't worth fixing. Hardware + labour > new. Besides, it was an old P4 system and not worth it.

So I bought a new machine. The best deal I found was an HP bundle at Costco: a quad core system with 8Gb of RAM, a 750Gb hard drive, a 25" high resolution monitor and Windows 7, all for under $1000.

Now even though I didn't lose any data, I've spent the better part of 40 hours getting this thing up to speed. Configuring it (thanks, Jim — I don't what I would have done without your help!), installing basic software, then physically installing it up North. I discovered that my wireless stick won't work, so I can't get it online until I hit Tiger Direct and get another one tomorrow, and my attempt at networking it with my laptop using my old router was fruitless. Windows 7 seems to work OK, but I haven't spent enough time learning how to take advantage of some of the new stuff. I will eventually.

Imagine how much more painful this would have been if I had lost data. Imagine yourself losing your computer. What about your emails? How about your address book? All your passwords and accounts and favourites. Your accounting and banking information. Your documents. Your photos... are you backed up?

I don't have the world's best backup system. Far from it. But what I do have, saved my bacon. So I'm going to suggest you might want to consider doing something similar. There are two parts to the backup, the data and the programs. I did not have the programs backed up and to tell you the truth, I don't really know how. I know it can be done: people talk about "ghosting" a drive or creating a system backup. I ran one yesterday on my laptop (a system backup). It took almost 12 hours to do, but it worked away in the background while I did other stuff.. I tried to do the new system too, creating a set of System recovery DVD's, but my DVD drive doesn't like my disks, apparently (it works, though -- I did copy some data onto a DVD). So I would have saved several dozen hours if I had done a system backup on the other machine — not really, though because who needs to save old Photoshop CS2, or my XP operating system? Or Office 2003?

Anyway, let's talk about something easier: backing up your data. First thing you need is something to back it up onto. DVD's are not OK. They degrade with time and are not totally reliable anyway. What you need is an external hard drive (Jim, I know, not good enough for those who use DROBO systems and multiple redundant backups, but I'm talking to folks like me who don't really have those extreme needs). Here's the drive I have: go buy yourself one for Christmas. It's only $109 at B&H. It's a Western Digital MyBook USB drive and it holds 1Tb (that's 1000 Gb!) of data. Click here to see the specs and you can order it at B&H, probably the most reliable place to buy stuff.

How do you do the backup? Couldn't be easier. Plug the drive into a USB port on your computer, and into power, then drag your entire "My Documents" folder onto it. Be careful not to just drag the shortcut, you need the whole folder. Open it, then back up a level to see the folder itself. My 'Documents' folder is almost 3Gb in size. That's only 0.3% of that 1Tb drive! Once it's there, rename it so that you know what date it was. Next time you do a backup, keep this one and give the new backup a fresh name. Because you have such a nice big backup drive, you don't need to delete it, but I generally delete the third one back, just to keep things clean.

Not finished. If you have Vista or Windows 7, your pictures are not in this folder! You need to do the same thing with your pictures folder. Am I making any sense? Here comes the hard part: your address book and your emails! They are likely not in the Documents folder. You need to open your email client (I use Outlook  2007, for instance) and locate where the data is stored. In Outlook, click on Data File management under the File tab, and it should tell you where the files are. Mine is at C:\Users\faczen\AppData\Local\Microsoft\Outlook. Or you could just search for *.pst. Once you find it, drag a copy (Outlook has to be closed) to your backup drive. Do the same thing with your "Favourites" list in your web browser. Now you're done.

So if your computer crashes, and you fix it or get a new one, you can plug the external drive in and copy all that stuff back into the machine. How often you do a backup is up to you: I do a full backup every month, plus I keep critical stuff in other places, like my active database and my QuickBooks files. I copy those every night to a USB flash drive and often to my backup drive and other computer. I'd be dead in the water without this data.

OK, I've rambled on enough about doing backups. You know you have to. If you haven't done one recently, stop reading this and get going. You'll be sorry if you don't, when (not if) your computer crashes.

I bought a Kenko Telextender.
Against my better judgement. I really wanted the Nikon TC-17e which is a 1.7x extender, but they're over $400. The jury is still out about the Kenko one. It's a 2x extender and yes, autofocusing works on my 70-200 lens. It does help you reach out and touch stuff, but I'm not convinced it's terribly sharp. I'll do some more testing, but here's a shot that shows what it does:


This paddle was over 100m away. This is the full frame image, cropped only slightly, reduced in size to make it manageable to post here. It was shot at 1/2000 second, f/11, ISO =800. On a tripod.

Here's another shot, comparing images with- and without the extender.


The main picture was taken without the extender, lens zoomed to 200mm. ISO=800, exposure = f/5.6 @ 1/2500 sec. The inset on the right is blown up out of this image. The inset on the left comes from the same shot taken with the 400mm (200mm x 2) at exactly the same settings.

There is a clear quality difference between the two shots: by virtue of the fact that the crop was bigger on the 400mm image. Not a great test, but it shows that there is a place for this converter in my camera bag. It was quite inexpensive, roughly 1/4 the price of the Nikon. BTW, I can't shoot pictures with this thing worth a damn without a tripod.

I'll take some more comparison shots later. There weren't any birds around today to shoot!

If you want to see and/or buy these telextenders, click here:
I promised you some images
Well I have two groups of photos to show you today.First, I got interested in shooting star trails. I set the camera up at about 1am and left the shutter open for a good hour, plus.


The top image is the original. The others are the same shot, manipulated a bit. The exposure was 3816 seconds (63 minutes) at f/8, ISO 400. Lens was my 24-120, set at 24mm.


These two images are "as shot" and with some extra noise reduction. Exposure was 4209 seconds (70 minutes) at f/10, ISO=200. For noise reduction, I used the "median" filter at a moderate level (9 px) on a new layer. I changed the blend mode to 'overlay' and reduced the opacity of the layer to about half, then used curves to bring the brightness back. Note the softness in the tree branches.

The D300 has some amazing noise reduction algorithms built in. I just found out how it works: the camera creates a second image with exactly the same duration as the original -- so this shot actually took almost 3 hours before i could see it. It mixes the two images together, subtracting any noise generated by the sensor. The colour of the image is a mystery. There's no light pollution in the direction I shot, so I don't really understand why the image is yellow. Someone suggested it's a white balance issue. The camera was on auto WB, and it selected a colour temperature of 4150K.

Here's another neat shot


 Exposure was 4915 seconds (82 minutes) at f/10, ISO=200


Here's another kind of star shot. It's Orion's Belt. This was shot at f/1.8 using my 50mm prime lens,
for 10 seconds at ISO=1600.

Let me leave you with a couple of family images. There's one of Maria, my daughter-in-law and one of my mother, both with my new granddaughter Leah. I selectively reduced the clarity slider on my mom's face, but otherwise, the pictures are pretty well as shot!


Enjoy!